Best Baby Diaper Bags for Travel: 7 Parent-Friendly Picks

Going outside with a baby becomes much easier when diapers, wipes, bottles, clothes, pacifiers, and small essentials stay organized in one place. That is why choosing one of the best baby diaper bags for travel can save time and reduce stress during daily outings, daycare, shopping, road trips, and family travel.

In this guide, we compared practical diaper bag backpacks that are spacious, easy to carry, and parent-friendly. Below, you can quickly check the top picks before reading the full reviews.

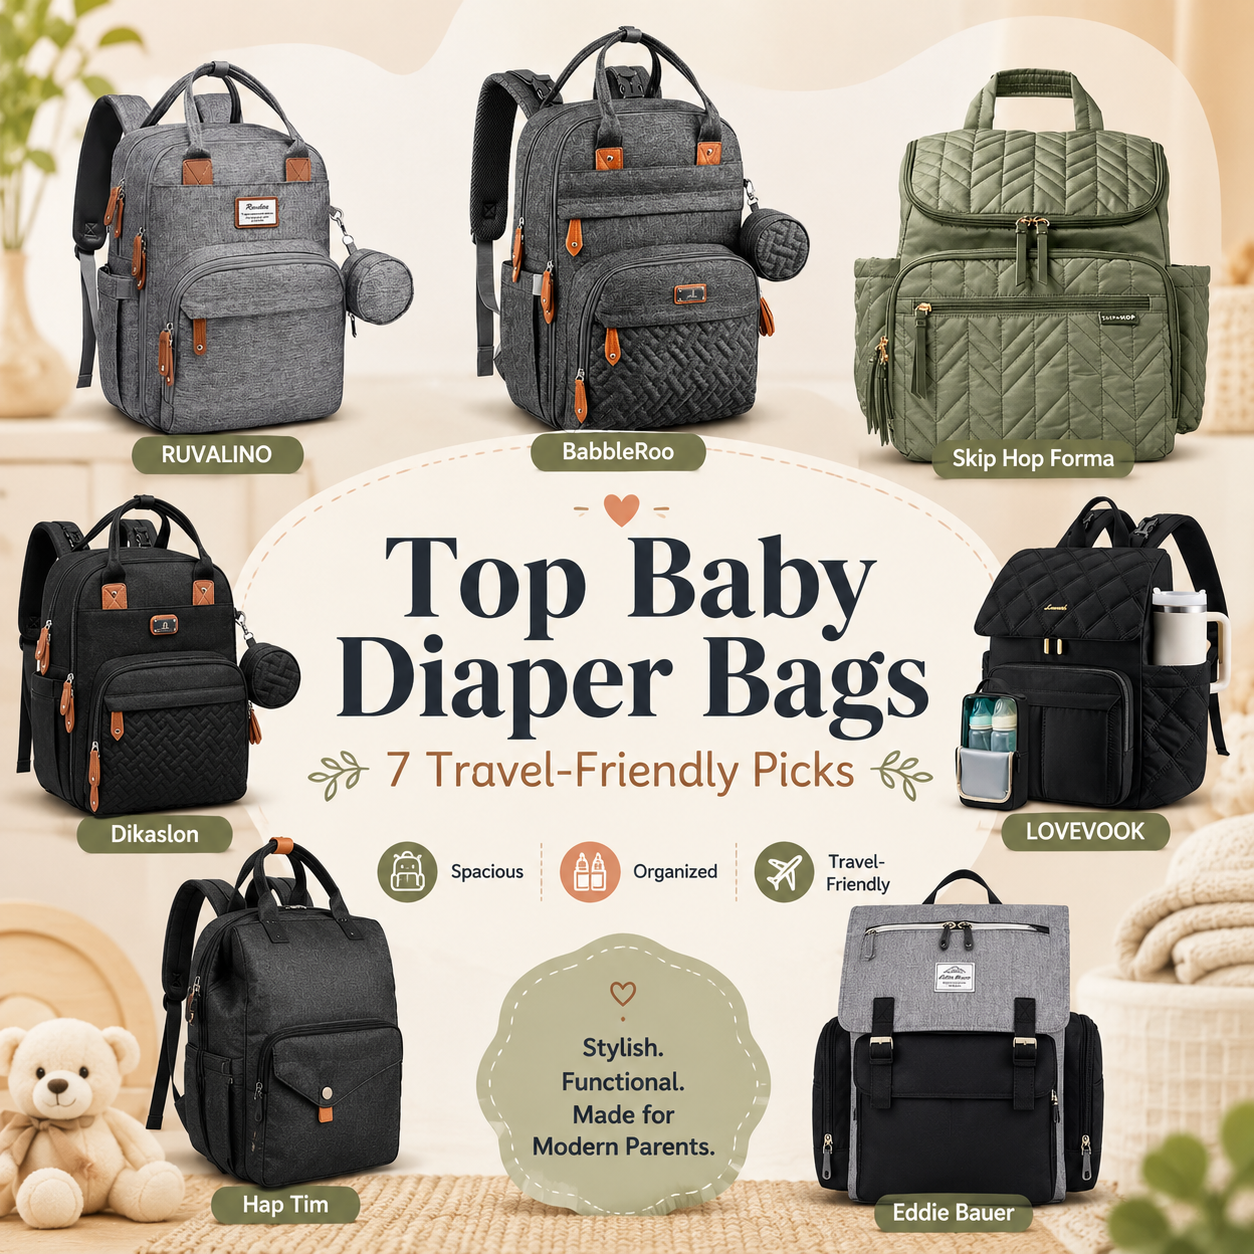
Quick pick: Compare the top diaper bag backpacks below and choose the one that best fits your travel, daycare, or daily outing needs.

Quick Comparison: Best Baby Diaper Bags for Travel

Product Best For Style Good For Link
RUVALINO Diaper Bag Backpack Best Overall Backpack Daily use, travel, daycare, baby registry gifts Check Price on Amazon
BabbleRoo Diaper Bag Backpack Best for Extra Storage Backpack Long outings, road trips, parents who pack more items Check Price on Amazon
Skip Hop Forma Diaper Backpack Best Stylish Pick Backpack Light travel, shopping, stroller walks, quick errands Check Price on Amazon
Dikaslon Diaper Bag Backpack Best for Family Trips Backpack Full-day outings, family travel, parents needing more space Check Price on Amazon
LOVEVOOK Diaper Bag Backpack Best Modern Design Backpack Stylish parents, daily travel, daycare, casual outings Check Price on Amazon
Hap Tim Diaper Bag Backpack Best Large Capacity Backpack Heavy packers, longer travel, twins, toddler essentials Check Price on Amazon
Eddie Bauer Diaper Bag Backpack Best Casual Pick Backpack Outdoor walks, simple daily use, dads and moms Check Price on Amazon

Quick Mobile Comparison

RUVALINO Diaper Bag Backpack
Best for: Best Overall
Style: Backpack
Good for: Daily use, travel, daycare, baby registry gifts
Check Price on Amazon
BabbleRoo Diaper Bag Backpack
Best for: Extra Storage
Style: Backpack
Good for: Long outings, road trips, parents who pack more items
Check Price on Amazon
Skip Hop Forma Diaper Backpack
Best for: Stylish Pick
Style: Backpack
Good for: Light travel, shopping, stroller walks, quick errands
Check Price on Amazon
Dikaslon Diaper Bag Backpack
Best for: Family Trips
Style: Backpack
Good for: Full-day outings, family travel, parents needing more space
Check Price on Amazon
LOVEVOOK Diaper Bag Backpack
Best for: Modern Design
Style: Backpack
Good for: Stylish parents, daily travel, daycare, casual outings
Check Price on Amazon
Hap Tim Diaper Bag Backpack
Best for: Large Capacity
Style: Backpack
Good for: Heavy packers, longer travel, twins, toddler essentials
Check Price on Amazon
Eddie Bauer Diaper Bag Backpack
Best for: Casual Pick
Style: Backpack
Good for: Outdoor walks, simple daily use, dads and moms
Check Price on Amazon

1. RUVALINO Diaper Bag Backpack — Best Overall Baby Diaper Bag for Travel

The RUVALINO Diaper Bag Backpack is one of the most practical choices for parents who want a simple, organized, and travel-friendly diaper bag. It has a backpack-style design, which makes it easier to carry when you are holding your baby, pushing a stroller, or walking through a store.

This bag is a strong option for daily use and travel because it gives parents enough room for diapers, wipes, bottles, clothes, toys, snacks, and personal items. It is also a good choice for baby registry gifts because most new parents need a reliable diaper bag they can use every day.

The biggest advantage of this type of diaper bag is balance. It is spacious enough for baby essentials but not too complicated for everyday use. Parents who want one diaper bag for shopping, daycare, short trips, and family outings can consider this a safe overall pick.

Best for: New parents, daily use, travel, daycare, and baby registry gifts.

Pros:

  • Backpack design keeps your hands free
  • Good storage for diapers, wipes, bottles, and clothes
  • Useful for both moms and dads
  • Practical choice for daily use and travel

Cons:

  • May feel large if you only need a very small bag
  • Not the most fashionable option for every parent
  • Can become heavy if overpacked

Check Price on Amazon

2. BabbleRoo Diaper Bag Backpack — Best Diaper Bag for Extra Storage

The BabbleRoo Diaper Bag Backpack is a good option for parents who like to carry extra items when going outside with their baby. If you often pack extra clothes, bottles, wipes, snacks, toys, and blankets, a larger diaper backpack can make travel much easier.

This bag is especially useful for longer outings, road trips, family visits, and parents who have more than one child. Instead of carrying several separate bags, you can keep most baby essentials in one organized backpack.

For parents who feel that smaller diaper bags are too limited, this type of bag can be a better fit. It gives more room and helps keep items separated so you do not have to search through a messy bag when your baby needs something.

Best for: Long outings, road trips, parents with more baby items, and full-day travel.

Pros:

  • Extra storage for longer trips
  • Helpful for parents who carry more baby essentials
  • Backpack style is easier for travel
  • Good for road trips and family outings

Cons:

  • May be too large for quick errands
  • Can feel heavy when fully packed
  • Parents who prefer minimalist bags may not need this much space

Check Price on Amazon

3. Skip Hop Forma Diaper Backpack — Best Stylish Diaper Bag for Parents

The Skip Hop Forma Diaper Backpack is a nice choice for parents who want a diaper bag that looks clean, modern, and easy to carry. It is useful for light travel, shopping trips, stroller walks, daycare, and quick errands.

Some diaper bags are very large and bulky, but many parents prefer something more stylish and simple. This type of diaper backpack can be a good fit if you want a bag that looks nice while still carrying the baby essentials you need.

It is not necessarily the largest option, but that can be a benefit for parents who do not want to carry too much. If your main goal is a stylish everyday diaper bag for light travel, this is a good product type to consider.

Best for: Stylish parents, light travel, shopping, stroller walks, and quick errands.

Pros:

  • Clean and modern look
  • Good for daily errands and light travel
  • Backpack design keeps carrying simple
  • Less bulky than many large diaper bags

Cons:

  • May not have enough space for heavy packers
  • Not the best option for long family trips
  • Style-focused parents may still want to compare colors and design

Check Price on Amazon

4. Dikaslon Diaper Bag Backpack — Best Diaper Bag for Family Trips

The Dikaslon Diaper Bag Backpack is a practical option for parents who need a roomy diaper bag for family trips and full-day outings. When you are away from home for several hours, you need more than just one or two diapers. You may need extra clothes, bottles, wipes, snacks, toys, and small comfort items.

This type of diaper bag is useful because it gives parents more packing space without needing to carry multiple bags. It can work well for family visits, road trips, outdoor walks, and travel days when you need more baby essentials with you.

If you often feel unprepared when leaving home with your baby, a larger diaper backpack can help. It gives you enough space to pack the items you may need during the day.

Best for: Family trips, full-day outings, parents needing more space, and travel days.

Pros:

  • Roomy design for longer outings
  • Good for full-day baby travel
  • Can reduce the need for extra bags
  • Useful for parents who want more organization

Cons:

  • May feel too big for short trips
  • Can become heavy if packed with too many items
  • Not ideal for parents who prefer small bags

Check Price on Amazon

5. LOVEVOOK Diaper Bag Backpack — Best Modern Diaper Bag Backpack

The LOVEVOOK Diaper Bag Backpack is a good option for parents who want a diaper bag that looks more like a modern everyday backpack. Some parents do not like diaper bags that look too baby-specific, so a stylish backpack design can feel more comfortable to use in public.

This bag style can work well for daycare, shopping, casual outings, and travel. It gives parents baby storage features while still looking clean and modern. That makes it a strong choice for parents who care about both style and function.

If both mom and dad will use the same diaper bag, a neutral modern backpack can also be a practical choice. It does not look overly feminine or too childish, so it can work for different users.

Best for: Stylish parents, daily travel, daycare, casual outings, and modern backpack lovers.

Pros:

  • Modern backpack-style design
  • Good for parents who want style and storage
  • Useful for daycare and daily travel
  • Can work well for both moms and dads

Cons:

  • Design preference depends on the buyer
  • May not be the largest option
  • Parents should compare pocket layout before buying

Check Price on Amazon

6. Hap Tim Diaper Bag Backpack — Best Large Capacity Diaper Bag

The Hap Tim Diaper Bag Backpack is a strong choice for parents who want a large-capacity diaper bag. If you have twins, a toddler and a baby, or you simply like to pack extra items, a larger backpack can be very helpful.

This type of bag is especially useful for longer travel days. You can carry diapers, wipes, bottles, snacks, extra outfits, blankets, toys, and parent essentials in one bag. That can make family travel more organized and less stressful.

For heavy packers, the best baby diaper bags for travel are usually the ones with more compartments and better structure. A large bag should not just be big; it should help you organize items properly.

Best for: Heavy packers, twins, longer travel, toddler essentials, and parents who carry extra items.

Pros:

  • Large capacity for more baby essentials
  • Good for longer trips and travel days
  • Helpful for parents with more than one child
  • Can replace multiple smaller bags

Cons:

  • Not ideal for parents who pack light
  • May feel bulky for quick errands
  • Can become heavy if filled completely

Check Price on Amazon

7. Eddie Bauer Diaper Bag Backpack — Best Casual Diaper Bag for Daily Use

The Eddie Bauer Diaper Bag Backpack is a practical choice for parents who like a simple, casual, and outdoor-friendly style. It can be useful for walks, short trips, family visits, shopping, and everyday baby care.

Not every parent wants a fancy diaper bag. Some parents simply want something that is comfortable, durable-looking, and easy to use. This type of diaper backpack can be a good fit for moms and dads who prefer a casual design.

It is also a good option for parents who want a diaper bag that does not look too delicate. If you often go outside, walk with a stroller, or need a simple everyday bag, this can be worth considering.

Best for: Outdoor walks, simple daily use, casual parents, dads, and moms.

Pros:

  • Simple and casual design
  • Good for everyday outings
  • Useful for stroller walks and short trips
  • Practical option for both dads and moms

Cons:

  • May not look as stylish as premium diaper bags
  • Storage layout may not fit every parent’s needs
  • Not the best option if you want a luxury-style diaper bag

Check Price on Amazon

How to Choose the Best Baby Diaper Bags for Travel

Before buying a diaper bag, think about how you will use it. The best baby diaper bags for travel are not always the most expensive ones. The best choice is the bag that fits your baby’s needs, your daily routine, and your comfort level.

Choose a Backpack Style for Hands-Free Carrying

For most parents, a backpack diaper bag is the easiest option. It keeps your hands free, spreads weight across both shoulders, and makes it easier to carry your baby, push a stroller, or handle luggage.

A tote diaper bag can look stylish, but it may feel heavy on one shoulder. For travel, shopping, airports, and longer walks, backpack-style diaper bags are usually more comfortable.

Check the Storage Capacity

A good travel diaper bag should have enough room for diapers, wipes, bottles, extra clothes, snacks, toys, and parent items. If the bag is too small, you may end up carrying another bag, which can be frustrating.

For short trips, a medium-size diaper bag may be enough. For full-day travel, road trips, or more than one child, a larger diaper backpack may be better.

Look for Multiple Pockets

Organization is one of the biggest reasons parents buy diaper bags. Separate pockets help you keep clean diapers, wet items, bottles, pacifiers, and small accessories in the right place.

When your baby needs something quickly, you do not want to search through a messy bag. That is why pocket layout matters.

Choose Insulated Bottle Pockets

Insulated bottle pockets can help keep bottles warm or cool for a short time. This is useful during travel, daycare drop-offs, shopping, and road trips.

If your baby uses bottles often, this feature can be very helpful.

Make Sure It Is Comfortable

A diaper bag can become heavy once you pack everything. Look for padded shoulder straps and a comfortable back design. If the bag is uncomfortable, you may not enjoy using it every day.

Pick Easy-to-Clean Material

Baby items can spill, leak, or get messy. A water-resistant or wipeable diaper bag is easier to maintain. This is especially useful for travel and daily use.

Backpack vs Tote Diaper Bag: Which One Is Better?

For travel, a backpack diaper bag is usually better. It is easier to carry, keeps your hands free, and feels more balanced when packed with baby items.

A tote diaper bag may look more fashionable, but it can become uncomfortable during long trips. It also keeps weight on one side of your body, which may feel tiring.

If your main goal is comfort and organization, choose a backpack diaper bag. If your main goal is style and you only take short trips, a tote may still work. But for most parents, backpack-style bags are more practical.

What Should You Pack in a Baby Diaper Bag for Travel?

A well-packed diaper bag can make outings much easier. Here are the basic items most parents should carry:

  • Diapers
  • Baby wipes
  • Changing pad
  • Extra baby clothes
  • Burp cloth
  • Bottles or sippy cup
  • Baby snacks
  • Pacifier
  • Small toys
  • Diaper cream
  • Hand sanitizer
  • Plastic bags for dirty clothes or diapers
  • Parent items like phone, wallet, and keys

For short trips, you may only need the basics. For longer travel, pack extra clothes, more diapers, snacks, and comfort items. The right diaper bag helps keep all of these things organized so you can find them quickly.

Best Baby Diaper Bag by Use Case

Best for New Parents

New parents should choose a simple, organized diaper backpack with enough space for daily essentials. The RUVALINO Diaper Bag Backpack is a strong overall choice for most new parents.

Best for Long Trips

For long trips, choose a larger diaper backpack with extra compartments. BabbleRoo, Dikaslon, and Hap Tim style bags are good options for parents who carry more items.

Best for Stylish Parents

If style matters, choose a modern-looking diaper backpack like Skip Hop Forma or LOVEVOOK. These bags look cleaner and less bulky than many traditional diaper bags.

Best for Dads

Dads may prefer a neutral backpack-style diaper bag that looks simple and practical. Eddie Bauer, RUVALINO, and LOVEVOOK style bags can work well for both moms and dads.

Best for Baby Shower Gifts

A diaper backpack is one of the most useful baby shower gifts. Choose a neutral color, spacious design, and practical layout so the parents can use it every day.

Frequently Asked Questions

What is the best baby diaper bag for travel?

The best baby diaper bag for travel is usually a backpack-style diaper bag with multiple pockets, bottle storage, a changing pad, and comfortable shoulder straps. It should be spacious but not too heavy.

Are backpack diaper bags better than tote diaper bags?

For travel, backpack diaper bags are usually better because they keep your hands free and spread weight across both shoulders. Tote bags can look stylish but may feel uncomfortable during longer trips.

What size diaper bag do I need?

For daily errands, a medium-size diaper bag is usually enough. For road trips, full-day outings, twins, or more than one child, a larger diaper backpack may be better.

Do I need insulated bottle pockets?

Insulated bottle pockets are helpful if your baby uses bottles regularly. They can help keep bottles warm or cool for a short time during travel or errands.

Is a diaper bag a good baby shower gift?

Yes, a diaper bag is one of the most practical baby shower gifts. New parents can use it almost every day for diapers, wipes, bottles, clothes, and other baby essentials.

Can dads use diaper backpacks?

Yes. Many diaper backpacks are designed with neutral colors and simple styles, making them suitable for both moms and dads.

Final Verdict: Which Baby Diaper Bag Should You Buy?

If you want one practical choice, choose a backpack-style diaper bag with enough storage, multiple pockets, insulated bottle holders, a changing pad, and comfortable straps. For most parents, this type of bag offers the best mix of organization, comfort, and travel convenience.

The best baby diaper bags for travel should make parenting outside the home easier. They should help you carry diapers, wipes, bottles, clothes, snacks, and parent items without turning everything into a mess.

Best overall: RUVALINO Diaper Bag Backpack

Best for extra storage: BabbleRoo Diaper Bag Backpack

Best stylish pick: Skip Hop Forma Diaper Backpack

Best for family trips: Dikaslon Diaper Bag Backpack

Best modern design: LOVEVOOK Diaper Bag Backpack

Best large capacity: Hap Tim Diaper Bag Backpack

Best casual pick: Eddie Bauer Diaper Bag Backpack

For most parents, the best starting point is a diaper backpack that matches your daily routine. If you travel often, choose more space. If you mostly run short errands, choose a lightweight option. If both parents will use the same bag, choose a neutral backpack design.

A good diaper bag will not just carry baby items. It will help you feel more prepared, organized, and comfortable every time you leave the house with your baby.

Grafix Edge Stencil Film tips and tricks

Check the latest price on Amazon

Grafix Edge Stencil Film is a versatile tool that can be used for a variety of projects, from spray painting to screen printing. Here are a few tips and tricks to help you get the most out of this product:

  • Use a sharp blade. A dull blade will make it difficult to cut through the film cleanly, which can lead to ragged edges on your stencil.
  • Cut outside the lines. When you’re cutting your stencil, it’s best to cut outside the lines of your design. This will give you a little bit of extra room to work with, and it will also help to prevent the paint from bleeding under the edges of your stencil.
  • Use a lightbox. If you’re working with a complex design, a lightbox can be a great help. It will allow you to see your design clearly, and it will also make it easier to cut out the small details.
  • Adhere your stencil securely. Once you’ve cut out your stencil, you’ll need to adhere it securely to your surface. You can use spray adhesive, double-sided tape, or even just plain old tape.
  • Use the right type of paint. Not all paints are created equal. Some paints, such as acrylic paint, will bleed under the edges of your stencil. It’s best to use a paint that is specifically designed for stenciling.
  • Clean your stencil properly. After you’re finished using your stencil, it’s important to clean it properly. This will help to prevent the paint from drying and hardening on the film, which can make it difficult to reuse your stencil.

Here are some additional tips and tricks:

  • If you’re using Grafix Edge Stencil Film for spray painting, be sure to use a light coat of paint. A heavy coat of paint can make it difficult to see your design, and it can also cause the paint to bleed under the edges of your stencil.
  • If you’re using Grafix Edge Stencil Film for screen printing, be sure to use a high-quality screen. This will help to ensure that your print is clear and crisp.
  • Grafix Edge Stencil Film can also be used for other projects, such as drawing, painting, and airbrushing. Experiment with different techniques to see what you can create!

I hope these tips help you get the most out of Grafix Edge Stencil Film. Have fun creating!

How do you use stencil film?

Here are the steps on how to use stencil film:

  1. Prepare your surface. The surface you plan to stencil on should be clean, smooth, and dry. If you’re working on a porous surface, such as wood or canvas, you may need to apply a coat of primer first.
  2. Trace your design. If you have a pre-made design, you can trace it onto the stencil film using a pencil or marker. If you’re creating your own design, you can draw it freehand or use a stencil template.
  3. Cut out your stencil. Use a sharp blade to cut out your design. Be sure to cut outside the lines of your design to give yourself a little bit of extra room to work with.
  4. Adhere your stencil. There are a few different ways to adhere your stencil to your surface. You can use spray adhesive, double-sided tape, or even just plain old tape.
  5. Apply paint. Use the type of paint that is recommended for stenciling. Apply the paint in a light coat, and be sure to work from the inside out to prevent the paint from bleeding under the edges of your stencil.
  6. Remove your stencil. Once the paint is dry, carefully remove your stencil. Be sure to peel it away from the edges to avoid tearing the film.
  7. Clean your stencil. After you’re finished using your stencil, it’s important to clean it properly. This will help to prevent the paint from drying and hardening on the film, which can make it difficult to reuse your stencil.

Here are some additional tips:

  • If you’re using stencil film for spray painting, be sure to use a light coat of paint. A heavy coat of paint can make it difficult to see your design, and it can also cause the paint to bleed under the edges of your stencil.
  • If you’re using stencil film for screen printing, be sure to use a high-quality screen. This will help to ensure that your print is clear and crisp.
  • Grafix Edge Stencil Film can also be used for other projects, such as drawing, painting, and airbrushing. Experiment with different techniques to see what you can create!

I hope this helps!

Is stencil film reusable?

Yes, stencil film is reusable. However, the number of times you can reuse it will depend on the type of stencil film you are using and how you are using it.

Some stencil films are made of a thin plastic that can be washed and reused several times. Other stencil films are made of a thicker plastic that is more durable and can be reused even more times.

If you are using stencil film for spray painting, you may be able to reuse it more times than if you are using it for screen printing. This is because spray painting uses a lighter coat of paint, which is less likely to damage the stencil film.

To extend the life of your stencil film, it is important to clean it properly after each use. You can use soap and water to clean stencil film, or you can use a special stencil cleaner.

If you are careful with your stencil film, you should be able to reuse it many times. This can save you money and reduce waste, making it a more sustainable option.

Here are some tips for extending the life of your stencil film:

  • Use a sharp blade when cutting out your stencil. A dull blade can make it difficult to cut through the film cleanly, which can damage the film.
  • Be careful not to overstretch the film. Overstretching the film can weaken it and make it more likely to tear.
  • Clean your stencil properly after each use. This will help to prevent the paint from drying and hardening on the film, which can make it difficult to reuse the film.
  • Store your stencil film in a cool, dry place. This will help to prevent the film from warping or cracking.

By following these tips, you can help to extend the life of your stencil film and get the most out of it.

Grafix Edge Stencil Film is a versatile tool that can be used for a variety of projects, from spray painting to screen printing. Here are some of the pros and cons of this product:

Pros:

  • Reusable: Grafix Edge Stencil Film can be reused multiple times, which can save you money and reduce waste.
  • Durable: This stencil film is made of a thick plastic that is resistant to tearing and warping.
  • Easy to use: Grafix Edge Stencil Film is easy to cut and apply, even for beginners.
  • Versatile: This stencil film can be used with a variety of paints and mediums.

Cons:

  • Not as detailed as some other stencil films: Grafix Edge Stencil Film is not as detailed as some other stencil films, so it may not be suitable for projects that require fine detail.
  • Can be difficult to clean: Some users have found that Grafix Edge Stencil Film can be difficult to clean, especially if it is used with acrylic paint.
  • Not as opaque as some other stencil films: Grafix Edge Stencil Film is not as opaque as some other stencil films, so it may not be suitable for projects where you need a sharp contrast between the stencil and the background.

Overall, Grafix Edge Stencil Film is a versatile and durable stencil film that is a good option for a variety of projects. However, it is not as detailed as some other stencil films and can be difficult to clean.

Glow in the dark spray paint tips and tricks 2023

Check the latest price on Amazon

Here are some tips and tricks for using glow in the dark spray paint:

  • Choose a good quality paint. Not all glow in the dark spray paints are created equal. Some are brighter than others, and some last longer. Read reviews before you buy to make sure you’re getting a good product.
  • Prime your surface. Glow in the dark paint works best on a light-colored surface. If you’re painting a dark object, prime it with a white primer first. This will help the paint glow brighter.
  • Apply multiple coats. The more coats of glow in the dark paint you apply, the brighter the glow will be. However, don’t overdo it, or the paint will become too thick and won’t glow as well.
  • Charge the paint. Before you can see the glow, you need to charge the paint with light. This can be done by exposing the painted object to sunlight, a black light, or a UV flashlight.
  • Let the paint dry completely. Glow in the dark paint takes longer to dry than regular paint. Be sure to let it dry completely before handling it or exposing it to light.
  • Store the paint in a cool, dark place. Glow in the dark paint will last longer if it’s stored in a cool, dark place.

Here are some additional tips:

  • Use a light touch when applying the paint. Too much paint will make the glow less bright.
  • Use a steady back and forth motion when spraying the paint. This will help to create an even coat.
  • Cover your work area with a drop cloth to protect it from overspray.
  • Wear gloves and a mask to protect yourself from the paint fumes.

With these tips, you’ll be able to create amazing glow in the dark projects that will light up the night.

Here are some additional ideas for glow in the dark projects:

  • Paint your bedroom ceiling with glow in the dark paint. This will create a starry night effect that will look amazing at night.
  • Paint your kids’ toys with glow in the dark paint. This will make them more fun to play with in the dark.
  • Paint your sidewalk or driveway with glow in the dark paint. This will create a safe walkway at night.
  • Make glow in the dark jewelry or accessories. This is a fun and easy way to add some sparkle to your outfit.
  • Decorate your home with glow in the dark decorations. This is a great way to add some fun and whimsy to your space.

The possibilities are endless! So get creative and have fun with glow in the dark paint.

How many hours does glow in the dark paint last?

The number of hours that glow in the dark paint lasts depends on a few factors, including the quality of the paint, the amount of light it is exposed to, and the temperature.

  • Quality of the paint: High-quality glow in the dark paint will last longer than low-quality paint.
  • Amount of light: The more light the paint is exposed to, the brighter it will glow and the longer it will last.
  • Temperature: The colder the temperature, the longer the paint will last.

In general, glow in the dark paint will last for a few hours after being exposed to light. However, some paints can last for up to 12 hours.

Here is a table that shows the approximate number of hours that different types of glow in the dark paint will last:

Type of paint

Hours of glow
Low-quality paint 1-2 hours
Mid-quality paint 3-5 hours
High-quality paint 5-12 hours

It is important to note that these are just approximate numbers. The actual number of hours that a particular paint will last will depend on the factors mentioned above.

Here are some tips to help your glow in the dark paint last longer:

  • Charge the paint with as much light as possible. The brighter the paint is charged, the longer it will glow.
  • Store the paint in a cool, dark place. This will help to preserve the phosphorescent pigments in the paint.
  • Avoid exposing the paint to extreme temperatures. High temperatures can shorten the lifespan of the paint, while low temperatures can make it harder for the paint to glow.

Following these tips will help your glow in the dark paint last longer and look its best.

What ingredients do you need for glow in the dark paint?

Sure, here are the ingredients you need for glow in the dark paint:

  • Glow in the dark pigment powder: This is the key ingredient that makes the paint glow. You can find glow in the dark pigment powder online or at some craft stores.
  • Paint: You can use any type of paint you like, but acrylic paint is a good choice because it is easy to work with and dries quickly.
  • Thinner: A thinner will help to thin the paint and make it easier to apply. You can use water or a special paint thinner.
  • Gloves: You should wear gloves when handling glow in the dark pigment powder, as it can stain your skin.
  • Mask: You should also wear a mask when handling glow in the dark pigment powder, as it can be harmful to breathe in.

Here are the steps on how to make glow in the dark paint:

  1. Mix the glow in the dark pigment powder with the paint. The amount of pigment powder you use will depend on how bright you want the paint to glow.
  2. Add a thinner to the paint mixture. The amount of thinner you use will depend on how thick you want the paint to be.
  3. Stir the paint mixture until it is smooth.
  4. Apply the paint to your desired surface.
  5. Charge the paint with light. This can be done by exposing the painted object to sunlight, a black light, or a UV flashlight.

Once the paint is charged, it will glow in the dark. The brightness of the glow will depend on the amount of glow in the dark pigment powder you used and how much light the paint was exposed to.

Here are some tips for making glow in the dark paint:

  • Use a light touch when mixing the paint. Too much pigment powder will make the paint too thick and it won’t glow as well.
  • Use a steady back and forth motion when applying the paint. This will help to create an even coat.
  • Cover your work area with a drop cloth to protect it from overspray.
  • Wear gloves and a mask to protect yourself from the paint fumes.

With these tips, you’ll be able to make your own glow in the dark paint and create amazing glow in the dark projects.

Does glow in the dark paint fade over time?


Yes, glow in the dark paint does fade over time. The amount of time it takes for the paint to fade will depend on a few factors, including the quality of the paint, the amount of light it is exposed to, and the temperature.

  • Quality of the paint: High-quality glow in the dark paint will last longer than low-quality paint.
  • Amount of light: The more light the paint is exposed to, the faster it will fade.
  • Temperature: The warmer the temperature, the faster the paint will fade.

In general, glow in the dark paint will start to fade after a few years. However, some paints can last for up to 10 years.

Here are some tips to help your glow in the dark paint last longer:

  • Charge the paint with as much light as possible. The brighter the paint is charged, the longer it will glow.
  • Store the paint in a cool, dark place. This will help to preserve the phosphorescent pigments in the paint.
  • Avoid exposing the paint to extreme temperatures. High temperatures can shorten the lifespan of the paint, while low temperatures can make it harder for the paint to glow.

Following these tips will help your glow in the dark paint last longer and look its best.

Here are some additional things to keep in mind:

  • The type of paint you use will also affect how long it lasts. Acrylic paint is a good choice because it is durable and can withstand exposure to light and weather.
  • The surface you paint will also affect the longevity of the glow. A smooth surface will allow the paint to glow more evenly, while a rough surface will make the glow appear more spotty.
  • If you want your glow in the dark paint to last as long as possible, you can seal it with a clear coat of varnish or polyurethane. This will help to protect the paint from the elements and prevent it from fading.

Is glow paint permanent?

Glow paint is not permanent. It will eventually fade over time, depending on the quality of the paint and how it is stored. However, with proper care, glow paint can last for several years.

The glow in glow paint comes from a type of pigment called phosphorescent pigment. Phosphorescent pigments absorb light and then release it slowly over time. This is what causes the paint to glow in the dark.

The amount of time that glow paint glows will depend on the quality of the paint and how much light it is exposed to. Typically, glow paint will glow for a few hours after being exposed to light. However, some paints can last for up to 12 hours.

To help your glow paint last longer, you should store it in a cool, dark place. This will help to preserve the phosphorescent pigments in the paint. You should also avoid exposing the paint to extreme temperatures, as this can shorten its lifespan.

If you want your glow paint to last as long as possible, you can seal it with a clear coat of varnish or polyurethane. This will help to protect the paint from the elements and prevent it from fading.

Here are some additional tips to help your glow paint last longer:

  • Charge the paint with as much light as possible. The brighter the paint is charged, the longer it will glow.
  • Avoid exposing the paint to direct sunlight. Direct sunlight can fade the paint more quickly.
  • Clean the paint regularly. Dust and dirt can build up on the paint and make it less effective.

Following these tips will help your glow paint last longer and look its best.

Here are some pros and cons of glow in the dark spray paint:

Pros:

  • Easy to apply: Glow in the dark spray paint is easy to apply with a sprayer. This makes it a great option for large projects.
  • Versatile: Glow in the dark spray paint can be used on a variety of surfaces, including wood, metal, plastic, and fabric.
  • Fun and creative: Glow in the dark spray paint can be used to create a variety of fun and creative projects.
  • Safe: Glow in the dark spray paint is typically non-toxic and safe for use indoors and outdoors.

Cons:

  • Short-lived glow: The glow from glow in the dark spray paint typically only lasts for a few hours after being charged with light.
  • Requires charging: The glow in glow in the dark spray paint will only appear if the paint has been charged with light. This means that you will need to expose the painted surface to light before it will glow.
  • Can be messy: Glow in the dark spray paint can be messy to apply, so it is important to wear protective gear when using it.

Overall, glow in the dark spray paint is a fun and creative way to add a touch of magic to your projects. However, it is important to be aware of its limitations, such as the short-lived glow and the need to charge it with light.

Rust-Oleum 7710830 Stops Rust Bright Coat Metallic Spray Paint tips and guides 2023

Check the latest price on Amazon

Rust-Oleum 7710830 Stops Rust Bright Coat Metallic Spray Paint is a versatile paint that can be used on a variety of surfaces, including metal, wood, concrete, and masonry. It dries to a shiny, metallic finish that is both durable and attractive.

Here are some tips and a guide for using Rust-Oleum 7710830 Stops Rust Bright Coat Metallic Spray Paint:

  • Prepare the surface. The surface you are painting should be clean, dry, and free of rust, grease, and dirt. If the surface is rusty, you will need to use a rust converter or a wire brush to remove the rust before painting.
  • Shake the can well. Shake the can vigorously for at least 2 minutes to ensure that the paint is well-mixed.
  • Apply the paint in thin, even coats. Do not apply too much paint in one coat, as this can cause the paint to run or drip. Allow each coat to dry completely before applying the next coat.
  • Recoat as needed. For best results, apply two coats of paint. Allow the first coat to dry completely before applying the second coat.
  • Allow the paint to dry completely. The paint will be dry to the touch in about 60 minutes, but it will take 24 hours to fully cure.

Here are some additional tips for using Rust-Oleum 7710830 Stops Rust Bright Coat Metallic Spray Paint:

  • Work in a well-ventilated area. The fumes from the paint can be harmful, so it is important to work in a well-ventilated area.
  • Protect your skin and clothing. The paint can stain skin and clothing, so it is important to wear gloves and old clothing when painting.
  • Use a clear coat finish. A clear coat finish can help to protect the paint and prevent it from fading.

With these tips in mind, you can easily use Rust-Oleum 7710830 Stops Rust Bright Coat Metallic Spray Paint to create a beautiful, durable finish on your projects.

Additional information:

  • The paint is available in a variety of colors, including gold, silver, copper, and bronze.
  • The paint has a dry time of 60 minutes and a cure time of 24 hours.
  • The paint is not recommended for use on plastic or painted surfaces.
  • The paint should be stored in a cool, dry place.

I hope this helps!

Does Rust-Oleum metallic spray paint need a top coat?

According to the Rust-Oleum website, Rust-Oleum metallic spray paint does not need a top coat. However, using a clear coat finish can help to protect the paint and prevent it from fading. A clear coat finish can also add a layer of shine to the paint.

If you decide to use a clear coat finish, it is important to use a clear coat that is compatible with metallic spray paint. Some clear coats can dull the metallic finish, so it is important to do your research before choosing a clear coat.

Here are some of the benefits of using a clear coat finish over Rust-Oleum metallic spray paint:

  • Protection: A clear coat finish can help to protect the paint from scratches, fading, and other damage.
  • Shine: A clear coat finish can add a layer of shine to the paint, making it look even more beautiful.
  • Durability: A clear coat finish can help to make the paint more durable, so it will last longer.

If you are looking for the best protection and durability for your Rust-Oleum metallic spray paint project, then using a clear coat finish is a good option. However, if you are not concerned about the durability of the paint, then you can skip the clear coat finish.

Ultimately, the decision of whether or not to use a clear coat finish is up to you. Weigh the pros and cons and decide what is best for your project.

Does Rustoleum spray paint stop rust?

Yes, Rustoleum spray paint can stop rust. However, it is important to use the right type of Rustoleum spray paint for the job.

Rustoleum makes a variety of spray paints that are designed to stop rust. These spray paints contain rust converters, which react with the rust to form a protective coating. This coating prevents the rust from spreading and further damaging the metal.

Some of the Rustoleum spray paints that can stop rust include:

  • Rust-Oleum Stops Rust Rust Reformer: This spray paint converts rust to a non-rusting surface. It can be applied directly to rust, without the need to sand or remove the rust first.
  • Rust-Oleum Stops Rust Enamel: This spray paint is a rust-preventative enamel that can be applied to bare metal or over existing rust. It provides a long-lasting, protective finish.
  • Rust-Oleum Stops Rust Primer: This spray primer is designed to be used under Rust-Oleum Stops Rust Enamel. It helps to improve the adhesion of the enamel and provides additional rust protection.

If you are looking for a way to stop rust, Rustoleum spray paint is a good option. However, it is important to choose the right type of spray paint for the job and to follow the instructions carefully.

Here are some additional tips for using Rustoleum spray paint to stop rust:

  • Prepare the surface: The surface you are painting should be clean, dry, and free of rust, grease, and dirt. If the surface is rusty, you will need to use a wire brush or a rust converter to remove the rust before painting.
  • Shake the can well: Shake the can vigorously for at least 2 minutes to ensure that the paint is well-mixed.
  • Apply the paint in thin, even coats: Do not apply too much paint in one coat, as this can cause the paint to run or drip. Allow each coat to dry completely before applying the next coat.
  • Recoat as needed: For best results, apply two coats of paint. Allow the first coat to dry completely before applying the second coat.
  • Allow the paint to dry completely: The paint will be dry to the touch in about 60 minutes, but it will take 24 hours to fully cure.

With these tips in mind, you can easily use Rustoleum spray paint to stop rust and protect your metal surfaces.

Rust-Oleum 7710830 Stops Rust Bright Coat Metallic Spray Paint is a versatile paint that can be used on a variety of surfaces, including metal, wood, concrete, and masonry. It dries to a shiny, metallic finish that is both durable and attractive.

Here are some of the pros and cons of Rust-Oleum 7710830 Stops Rust Bright Coat Metallic Spray Paint:

Pros:

  • Durable finish: The paint dries to a hard, durable finish that is resistant to scratches, fading, and other damage.
  • Attractive finish: The metallic finish is both stylish and attractive.
  • Easy to apply: The paint is easy to apply and dries quickly.
  • Variety of colors: The paint is available in a variety of colors, so you can find the perfect one for your project.
  • Affordable: The paint is relatively affordable, making it a good value for the money.

Cons:

  • May require a clear coat: For best results, you may want to apply a clear coat over the paint to protect it from the elements.
  • May not be suitable for all surfaces: The paint is not suitable for use on plastic or painted surfaces.
  • May have a strong odor: The paint has a strong odor that may be unpleasant for some people.

Overall, Rust-Oleum 7710830 Stops Rust Bright Coat Metallic Spray Paint is a good option for those looking for a durable, attractive, and easy-to-apply paint. However, it is important to be aware of the potential drawbacks before purchasing the paint.

3M Super 77 Multipurpose Permanent Spray Adhesive glue tips and tricks 2023

Check the latest price on Amazon

Here are some tips and tricks for using 3M Super 77 Multipurpose Permanent Spray Adhesive:

  • Shake the can well before use. This will ensure that the adhesive is evenly mixed.
  • Apply the adhesive in a well-ventilated area. The fumes can be strong, so it’s best to work in a place where you can get some fresh air.
  • Hold the can about 6 to 8 inches away from the surface and spray in a smooth, even motion. Don’t overspray, as this can make the adhesive difficult to control.
  • Allow the adhesive to dry for a few minutes before attaching the two surfaces. This will give the adhesive time to set and form a strong bond.
  • If you need to reposition the two surfaces after they’ve been sprayed, you can do so within 30 minutes. After that, the adhesive will be set and will not be able to be repositioned.
  • To clean up any excess adhesive, use a damp cloth. Be sure to wipe up the adhesive immediately, as it can become difficult to remove once it dries.

Here are some additional tips:

  • 3M Super 77 is a permanent adhesive, so be sure to use it on materials that you want to bond permanently.
  • This adhesive is not recommended for use on porous materials, such as wood or fabric. It will soak into these materials and may not create a strong bond.
  • If you are using 3M Super 77 on delicate materials, such as paper or fabric, be sure to test the adhesive in an inconspicuous area first. This will help you to determine the amount of adhesive that you need to use and to make sure that the adhesive does not damage the material.

I hope these tips help you to use 3M Super 77 Multipurpose Permanent Spray Adhesive effectively.

What is Super 77 spray adhesive used for?

Super 77 spray adhesive is a versatile adhesive that can be used for a variety of projects. It is a permanent adhesive that bonds quickly and securely to a wide range of materials, including paper, cardboard, fabric, plastic, metal, and wood.

Here are some of the most common uses for Super 77 spray adhesive:

  • Mounting posters, photos, and other artwork.
  • Attaching fabric to furniture or other surfaces.
  • Bonding foam to other materials.
  • Securing insulation in place.
  • Making repairs to clothing or other items.
  • Creating crafts and decorations.

Super 77 spray adhesive is a great choice for any project where you need a strong, permanent bond. It is easy to use and can be applied to a variety of materials. However, it is important to note that this adhesive is not recommended for use on porous materials, such as wood or fabric, as it will soak into these materials and may not create a strong bond.

Here are some additional tips for using Super 77 spray adhesive:

  • Shake the can well before use. This will ensure that the adhesive is evenly mixed.
  • Apply the adhesive in a well-ventilated area. The fumes can be strong, so it’s best to work in a place where you can get some fresh air.
  • Hold the can about 6 to 8 inches away from the surface and spray in a smooth, even motion. Don’t overspray, as this can make the adhesive difficult to control.
  • Allow the adhesive to dry for a few minutes before attaching the two surfaces. This will give the adhesive time to set and form a strong bond.
  • If you need to reposition the two surfaces after they’ve been sprayed, you can do so within 30 minutes. After that, the adhesive will be set and will not be able to be repositioned.
  • To clean up any excess adhesive, use a damp cloth. Be sure to wipe up the adhesive immediately, as it can become difficult to remove once it dries.

I hope this helps!

How long does 3M Super 77 last?

The shelf life of 3M Super 77 is about 15 months when stored in a cool, dry place. The adhesive will start to lose its effectiveness after this time, so it is best to use it before the expiration date.

Here are some tips for extending the shelf life of 3M Super 77:

  • Store the can in a cool, dry place. The ideal temperature range for storing 3M Super 77 is 60° to 80°F.
  • Keep the can upright. This will help to prevent the adhesive from settling to the bottom of the can.
  • Shake the can well before use. This will ensure that the adhesive is evenly mixed.
  • Use the adhesive within 30 minutes of opening the can. This will help to prevent the adhesive from drying out.

If you store 3M Super 77 properly, it should last for several years. However, it is always best to check the expiration date on the can before using it.

Here are some additional tips:

  • If you are not sure how long 3M Super 77 has been stored, it is best to err on the side of caution and not use it.
  • If the adhesive has become thick or separated, it is not safe to use.
  • If you have any questions about the shelf life of 3M Super 77, you can contact 3M customer service.

Which is stronger 3M 77 or 3M 90?

3M 90 is stronger than 3M 77. 3M 90 has a higher initial tack, which means that it bonds to surfaces more quickly and securely. It also has a higher shear strength, which means that it can withstand more force before the bond breaks.

Here is a table comparing the adhesive strengths of 3M 77 and 3M 90:

Adhesive Initial Tack Shear Strength
3M 77 120 lbs./in. 175 lbs./in.
3M 90 160 lbs./in. 250 lbs./in.

As you can see, 3M 90 has a higher initial tack and shear strength than 3M 77. This means that 3M 90 will bond to surfaces more quickly and securely, and it can withstand more force before the bond breaks.

However, it is important to note that 3M 90 is also a more permanent adhesive than 3M 77. This means that it can be more difficult to remove 3M 90 if you need to make a change to your project.

So, which adhesive is right for you? If you need a strong, permanent bond that can withstand a lot of force, then 3M 90 is the better choice. However, if you need an adhesive that is easier to remove, then 3M 77 may be a better option.

Ultimately, the best way to decide which adhesive is right for you is to consider the specific needs of your project.

How long does it take for 3M Super 77 spray adhesive to dry?

The drying time of 3M Super 77 spray adhesive depends on a few factors, including the temperature and humidity of the environment, the amount of adhesive applied, and the type of surfaces being bonded. However, in general, it takes about 15 seconds to 1 minute for the adhesive to dry to the touch. The bonding range is 15 seconds to 15 minutes.

Here are some tips for drying 3M Super 77 spray adhesive:

  • Apply the adhesive in a well-ventilated area. This will help the adhesive to dry more quickly.
  • Use a light coat of adhesive. A heavier coat of adhesive will take longer to dry.
  • Allow the adhesive to dry completely before handling the project. This will help to prevent the adhesive from coming loose.

If you are working in a cold or humid environment, the drying time of 3M Super 77 spray adhesive may be longer. You may also need to use a hair dryer or heat gun to help the adhesive dry more quickly.

Here are some additional tips:

  • If you are not sure how long 3M Super 77 needs to dry, it is best to err on the side of caution and wait longer.
  • If the adhesive is still tacky after a few minutes, you can use a hair dryer or heat gun to help it dry more quickly.
  • Be careful not to overheat the adhesive, as this can damage the surfaces being bonded.

I hope this helps!

Here are some of the pros and cons of 3M Super 77 Multipurpose Permanent Spray Adhesive:

Pros:

  • Strong, permanent bond: 3M Super 77 forms a strong, permanent bond that can withstand a lot of force.
  • Versatile: 3M Super 77 can be used on a wide variety of materials, including paper, cardboard, fabric, plastic, metal, and wood.
  • Easy to use: 3M Super 77 is easy to apply and can be used with a variety of surfaces.
  • Repositionable: 3M Super 77 can be repositioned for up to 30 minutes after application.
  • Low odor: 3M Super 77 has a low odor, making it a good choice for indoor use.

Cons:

  • Permanent bond: 3M Super 77 is a permanent adhesive, so it can be difficult to remove if you need to make a change to your project.
  • Can be messy: 3M Super 77 can be messy to apply, so it is important to use it in a well-ventilated area.
  • Can be flammable: 3M Super 77 is flammable, so it is important to use it in a safe manner.

Overall, 3M Super 77 is a versatile and effective adhesive that is a good choice for a variety of projects. However, it is important to be aware of the pros and cons of this adhesive before using it.

Here are some additional tips for using 3M Super 77:

  • Shake the can well before use. This will ensure that the adhesive is evenly mixed.
  • Apply the adhesive in a well-ventilated area. The fumes can be strong, so it’s best to work in a place where you can get some fresh air.
  • Hold the can about 6 to 8 inches away from the surface and spray in a smooth, even motion. Don’t overspray, as this can make the adhesive difficult to control.
  • Allow the adhesive to dry completely before handling the project. This will help to prevent the adhesive from coming loose.
  • To clean up any excess adhesive, use a damp cloth. Be sure to wipe up the adhesive immediately, as it can become difficult to remove once it dries.

I hope this helps!

Liquitex Professional Gesso Surface Prep Medium Tips and tricks 2023

Check the latest price on Amazon

Here are some tips and tricks for using Liquitex Professional Gesso Surface Prep Medium:

  • Shake the bottle well before using. This will ensure that the gesso is well-mixed and that you get an even application.
  • Apply the gesso with a brush or roller. A brush will give you more control, while a roller will be faster.
  • Apply the gesso in thin, even coats. This will help to prevent the gesso from cracking or peeling.
  • Let each coat of gesso dry completely before applying the next coat. This may take several hours, depending on the humidity and temperature.
  • Sand the gesso between coats to create a smooth, even surface. Use a fine-grit sandpaper for best results.
  • Clean your brushes and rollers thoroughly with soap and water after use. This will prevent the gesso from hardening and making your brushes unusable.

Additional tips:

  • For a smoother finish, you can thin the gesso with water. Start with a small amount of water and add more as needed until you reach the desired consistency.
  • If you want to add a tint to the gesso, you can mix in a small amount of acrylic paint. Just be sure to use a transparent or translucent paint so that the gesso doesn’t become opaque.
  • You can also use Liquitex Professional Gesso Surface Prep Medium to prime wood, paper, and other surfaces. Just be sure to test the gesso on a small area first to make sure that it doesn’t react adversely with the surface.

Common mistakes to avoid when using Liquitex Professional Gesso Surface Prep Medium:

  • Not shaking the bottle well before use. This can cause the gesso to be unevenly mixed, which can lead to cracking or peeling.
  • Applying the gesso too thickly. This can also lead to cracking or peeling.
  • Not letting each coat of gesso dry completely before applying the next coat. This can cause the gesso to become gummy and difficult to work with.
  • Not sanding the gesso between coats. This can leave a rough surface that will affect the final finish of your painting.

I hope these tips help you get the most out of Liquitex Professional Gesso Surface Prep Medium.

What is the difference between gesso and acrylic medium?

Gesso and acrylic medium are both used to prepare surfaces for painting, but they have different properties and uses.

  • Gesso is a white paint that is made with a binder, such as chalk or titanium white, and a drying agent. It is typically used to prime canvases and other surfaces before painting with acrylics or oils. Gesso provides a smooth, even surface that helps the paint to adhere and prevents it from soaking into the surface. It also gives the paint a matte finish.
  • Acrylic medium is a clear liquid that is made with acrylic resins. It can be used to thin acrylic paint, extend its drying time, or modify its properties. Acrylic mediums are also available in matte, satin, and gloss finishes.

Here is a table that summarizes the key differences between gesso and acrylic medium:

Feature Gesso Acrylic Medium
Color White Clear
Binder Chalk, titanium white, or other pigment Acrylic resins
Drying time Fast Varies depending on the medium
Finish Matte Matte, satin, or gloss
Use Priming surfaces for painting Thinning acrylic paint, extending drying time, or modifying properties

Here are some additional points to consider when choosing between gesso and acrylic medium:

  • Gesso is more opaque than acrylic medium, so it will give your painting a more opaque finish.
  • Acrylic medium is more versatile than gesso, as it can be used for a variety of purposes, such as thinning paint, extending drying time, or modifying properties.
  • Gesso is typically more affordable than acrylic medium.

Ultimately, the best choice for you will depend on your individual needs and preferences. If you are looking for a clear, matte finish that will help your paint to adhere, then gesso is a good option. If you are looking for a more versatile product that can be used for a variety of purposes, then acrylic medium is a good option.

What is gesso medium used for?

Gesso is a white paint that is used to prepare surfaces for painting. It’s typically made with a binder, such as chalk or titanium white, and a drying agent. It can be used on a variety of surfaces, including canvas, wood, and paper.

Benefits, including:

  • It provides a smooth, even surface that helps the paint to adhere.
  • It prevents the paint from soaking into the surface.
  • It gives the paint a matte finish.
  • It can be tinted to create different colors.

Used for a variety of purposes, including:

  • Priming canvases for painting with acrylics or oils.
  • Preparing wood surfaces for painting.
  • Creating a smooth surface for collage or mixed media work.
  • Tinting paper for watercolor painting.
  • Creating a protective finish for artwork.

Gesso is a versatile and easy-to-use product that can be used to improve the quality of your paintings. If you are looking for a way to prepare your surfaces for painting, gesso is a good option to consider.

Here are some additional tips for using gesso:

  • Shake the bottle well before using. This will ensure that the gesso is well-mixed and that you get an even application.
  • Apply the gesso in thin, even coats. This will help to prevent the gesso from cracking or peeling.
  • Let each coat of gesso dry completely before applying the next coat. This may take several hours, depending on the humidity and temperature.
  • Sand the gesso between coats to create a smooth, even surface. Use a fine-grit sandpaper for best results.
  • Clean your brushes and rollers thoroughly with soap and water after use. This will prevent the gesso from hardening and making your brushes unusable.

I hope this helps!

What is the benefit of gesso?

Gesso is a white paint that is used to prepare surfaces for painting. It has a number of benefits, including:

  • It provides a smooth, even surface that helps the paint to adhere. This is especially important for canvas, which can be rough and uneven. Gesso creates a smooth surface that allows the paint to flow evenly and prevents it from soaking into the canvas.
  • It prevents the paint from soaking into the surface. This is important for both acrylic and oil paints, as it can prevent the paint from becoming too thick and difficult to work with.
  • It gives the paint a matte finish. This is a personal preference, but many artists prefer the matte finish that gesso provides.
  • It can be tinted to create different colors. This can be useful if you want to create a specific color palette for your painting.

Overall, gesso is a versatile and easy-to-use product that can be used to improve the quality of your paintings. If you are looking for a way to prepare your surfaces for painting, gesso is a good option to consider.

Here are some additional benefits of using gesso:

  • It can extend the life of your artwork. Gesso creates a protective barrier between the paint and the surface, which can help to prevent the paint from fading or cracking over time.
  • It can make your paintings more vibrant. Gesso helps the paint to reflect light more evenly, which can give your paintings a more vibrant appearance.
  • It can make your paintings easier to clean. Gesso creates a non-porous surface that is less likely to attract dirt and dust. This makes your paintings easier to clean and maintain.

If you are considering using gesso, I recommend doing some research to find the right product for your needs. There are many different types of gesso available, so it is important to choose one that is appropriate for the surface you are painting on and the type of paint you will be using.

Can I put gesso over acrylic paint?

Yes, you can put gesso over acrylic paint. In fact, it is a common practice to do so, as it can help to create a smooth, even surface for the next layer of paint. Gesso is also a good way to seal in acrylic paint and prevent it from fading or cracking over time.

Here are some tips for putting gesso over acrylic paint:

  • Make sure the acrylic paint is dry before applying the gesso. If the acrylic paint is still wet, the gesso may not adhere properly.
  • Sand the acrylic paint lightly before applying the gesso. This will help the gesso to adhere better and create a smoother finish.
  • Apply the gesso in thin, even coats. This will help to prevent the gesso from cracking or peeling.
  • Let each coat of gesso dry completely before applying the next coat. This may take several hours, depending on the humidity and temperature.

If you are using a tinted gesso, it is important to note that the color of the gesso may affect the final color of your painting. If you are not sure how the gesso will affect the color, it is a good idea to test it on a small area of your painting first.

Overall, putting gesso over acrylic paint is a safe and effective way to create a smooth, even surface for your next painting. By following these tips, you can ensure that your gesso will adhere properly and create a beautiful finish.

Liquitex Professional Gesso Surface Prep Medium is a popular gesso that is used by artists to prepare surfaces for painting. It has a number of pros and cons, which are summarized below:

Pros:

  • It is easy to use. Liquitex Professional Gesso Surface Prep Medium can be applied with a brush or roller, and it dries quickly.
  • It is versatile. Liquitex Professional Gesso Surface Prep Medium can be used on a variety of surfaces, including canvas, wood, and paper.
  • It is affordable. Liquitex Professional Gesso Surface Prep Medium is a relatively inexpensive gesso.
  • It is archival. Liquitex Professional Gesso Surface Prep Medium is archival, which means that it will not yellow or fade over time.

Cons:

  • It can be thick. Liquitex Professional Gesso Surface Prep Medium can be thick, which can make it difficult to apply in thin coats.
  • It can be difficult to sand. Liquitex Professional Gesso Surface Prep Medium can be difficult to sand, especially if it is applied in thick coats.
  • It can be messy. Liquitex Professional Gesso Surface Prep Medium can be messy, especially if it is applied with a brush.

Overall, Liquitex Professional Gesso Surface Prep Medium is a good option for artists who are looking for an easy-to-use, affordable, and archival gesso. However, it is important to be aware of the potential downsides of this gesso before using it.

Here are some additional pros and cons of Liquitex Professional Gesso Surface Prep Medium that you may want to consider:

Pros:

  • It is a water-based gesso, which makes it less toxic than solvent-based gessos.
  • It is available in a variety of colors, which can be helpful if you want to create a specific color palette for your painting.
  • It can be tinted with acrylic paint to create custom colors.

Cons:

  • It can yellow slightly over time, especially if it is exposed to sunlight.
  • It is not as durable as some other types of gesso, so it may not be suitable for outdoor use.

Ultimately, the best way to decide if Liquitex Professional Gesso Surface Prep Medium is right for you is to try it out and see how you like it. If you are looking for an easy-to-use, affordable, and archival gesso, then this is a good option to consider.

Mod podge spray tips and tricks 2023

Check the latest price on Amazon

Here are some tips and tricks for using Mod Podge spray:

  • Shake the bottle well before using. This will ensure that the product is evenly mixed and that you get a consistent application.
  • Protect your work surface. Mod Podge spray can be messy, so it’s a good idea to cover your work surface with a drop cloth or newspaper.
  • Start with a light coat. It’s better to apply too little than too much, as Mod Podge can be difficult to sand off if you apply too thick of a coat.
  • Work in small sections. This will help you to avoid drips and uneven application.
  • Let each coat dry completely before applying the next one. This will help to prevent the layers from peeling or lifting.
  • Use a heat gun or hair dryer to speed up the drying process. Just be careful not to overheat the project, as this could cause the Mod Podge to crack.
  • For best results, apply 2-3 coats of Mod Podge spray. This will help to create a durable, water-resistant finish.

Here are some additional tips:

  • Use a test piece of paper or fabric to see how the Mod Podge spray will look on your project. This will help you to avoid any surprises when you’re finished.
  • If you’re using Mod Podge spray on a delicate surface, such as fabric or paper, you may want to seal it with a clear coat of Mod Podge after it’s dry. This will help to protect the surface from fading or damage.
  • Mod Podge spray can be used to adhere a variety of materials, including paper, fabric, photos, and even glitter. Experiment with different materials to see what you can create.

With these tips in mind, you’ll be well on your way to creating beautiful Mod Podge spray projects.

How do you use Modge podge spray?

Here are the steps on how to use Mod Podge spray:

  1. Shake the bottle well. This will ensure that the product is evenly mixed and that you get a consistent application.
  2. Protect your work surface. Mod Podge spray can be messy, so it’s a good idea to cover your work surface with a drop cloth or newspaper.
  3. Prime the pump. Spray a few bursts of Mod Podge onto a scrap piece of paper or paper towel to prime the pump and ensure that the spray is consistent.
  4. Apply Mod Podge to your project. Hold the bottle about 8-10 inches away from your project and spray in a smooth, even motion. Work in small sections to avoid drips and uneven application.
  5. Let the first coat dry completely before applying the next one. This will help to prevent the layers from peeling or lifting.
  6. Add embellishments, if desired. Once the first coat is dry, you can add embellishments, such as glitter, beads, or stickers.
  7. Apply a top coat. Once you’re happy with your project, apply a top coat of Mod Podge to seal it and protect it from wear and tear.

Here are some additional tips:

  • For best results, apply 2-3 coats of Mod Podge spray. This will help to create a durable, water-resistant finish.
  • Use a heat gun or hair dryer to speed up the drying process. Just be careful not to overheat the project, as this could cause the Mod Podge to crack.
  • If you’re using Mod Podge spray on a delicate surface, such as fabric or paper, you may want to seal it with a clear coat of Mod Podge after it’s dry. This will help to protect the surface from fading or damage.
  • Mod Podge spray can be used to adhere a variety of materials, including paper, fabric, photos, and even glitter. Experiment with different materials to see what you can create.

I hope this helps!

How do you make Mod Podge spray dry faster?

There are a few ways to make Mod Podge spray dry faster:

  • Apply a thin coat. The thinner the coat of Mod Podge, the faster it will dry.
  • Use a heat gun or hair dryer. Hold the heat gun or hair dryer about 6 inches away from your project and move it in a circular motion. Be careful not to overheat the project, as this could cause the Mod Podge to crack.
  • Work in a warm, dry environment. The warmer and drier the environment, the faster the Mod Podge will dry.
  • Apply the Mod Podge in a well-ventilated area. The fumes from the Mod Podge can be strong, so it’s important to work in a well-ventilated area.

Here are some additional tips:

  • If you’re in a hurry, you can apply the Mod Podge and then place the project in a warm oven (set to the lowest setting) for a few minutes. This will help to speed up the drying process.
  • If you’re using Mod Podge spray on a delicate surface, such as fabric or paper, you may want to seal it with a clear coat of Mod Podge after it’s dry. This will help to protect the surface from fading or damage.
  • Mod Podge spray can be used to adhere a variety of materials, including paper, fabric, photos, and even glitter. Experiment with different materials to see what you can create.

I hope this helps!

Why is my Mod Podge spray still sticky?

There are a few reasons why your Mod Podge spray might still be sticky:

  • You applied too thick of a coat. Mod Podge spray dries clear, but it can take a while for the thicker coats to dry completely. If you applied too thick of a coat, it’s likely that the Mod Podge is still tacky.
  • You didn’t let the coats dry completely between applications. Mod Podge spray needs to dry completely before you apply the next coat. If you don’t let the coats dry completely, the Mod Podge will not adhere properly and will be more likely to be sticky.
  • The temperature or humidity is too low. Mod Podge spray dries best in warm, dry conditions. If the temperature or humidity is too low, the Mod Podge will take longer to dry and may be more likely to be sticky.
  • You used the wrong type of Mod Podge spray. There are different types of Mod Podge spray available, each with its own drying time. If you used a type of Mod Podge spray that is designed to dry quickly, it may still be sticky if you didn’t let it dry completely.

If your Mod Podge spray is still sticky, there are a few things you can do:

  • Wait longer. Give the Mod Podge more time to dry completely. If you’ve waited at least 24 hours and the Mod Podge is still sticky, you may need to wait even longer.
  • Apply a light coat of clear acrylic sealer. This will help to protect the Mod Podge and make it less sticky.
  • Sand the surface lightly. This will help to remove the sticky layer of Mod Podge and create a smooth surface for the next coat.

If you’ve tried all of these things and your Mod Podge spray is still sticky, you may need to contact the manufacturer for assistance.

Mod Podge spray is a versatile product that can be used for a variety of projects, including decoupage, paper crafting, and home decor. Here are some of the pros and cons of Mod Podge spray:

Pros:

  • Easy to use. Mod Podge spray is easy to apply and can be used on a variety of surfaces.
  • Fast-drying. Mod Podge spray dries quickly, so you can get your project finished in no time.
  • Water-resistant. Once Mod Podge spray is dry, it is water-resistant, so your project will be protected from the elements.
  • Durable. Mod Podge spray is durable and can withstand wear and tear.

Cons:

  • Can be messy. Mod Podge spray can be messy, so it’s important to work in a well-ventilated area and protect your work surface.
  • Can be difficult to control. It can be difficult to control the amount of Mod Podge spray that comes out of the bottle, so it’s important to apply it in a light, even coat.
  • Not as strong as other adhesives. Mod Podge spray is not as strong as other adhesives, so it may not be suitable for all projects.

Overall, Mod Podge spray is a versatile product that can be used for a variety of projects. It is easy to use, fast-drying, and water-resistant. However, it can be messy and difficult to control, and it is not as strong as other adhesives.

Apple Barrel Spray Paint tips and tricks 2023

Check the latest price on Amazon

Apple Barrel Spray Paint tips and tricks

Apple Barrel spray paint is a great option for a variety of projects, from crafting to home decor. Here are a few tips and tricks to help you get the most out of your Apple Barrel spray paint:

  • Shake the can well before use. This will help to ensure that the paint is evenly mixed and that you get a consistent finish.
  • Test the paint on a scrap piece of paper or cardboard before you start your project. This will help you to see how the paint looks and behaves, and to make sure that you’re happy with the color.
  • Apply the paint in thin, even coats. This will help to prevent the paint from dripping or running.
  • Allow each coat of paint to dry completely before applying the next coat. This will help to ensure that the paint bonds properly and that you get a smooth, even finish.
  • Protect your work surface with a drop cloth or newspaper. This will help to prevent the paint from getting on your work surface and making a mess.
  • Use a respirator or mask when spraying paint. This will help to protect your lungs from the fumes.

Here are some additional tips for using Apple Barrel spray paint:

  • For best results, use the paint in a well-ventilated area.
  • If you’re painting a large surface, start in the center and work your way out. This will help to prevent the paint from dripping.
  • If you’re painting a small surface, hold the can about 12 inches away from the surface and spray in a smooth, even motion.
  • To create a textured finish, spray the paint in a circular motion.
  • To create a gradient, start with a light coat of paint and gradually add more coats until you reach the desired intensity.

With these tips in mind, you’ll be able to use Apple Barrel spray paint to create beautiful and creative projects.

What is Apple Barrel paint good for?

Apple Barrel paint is an all-purpose acrylic craft paint that is good for a variety of projects, including:

  • Woodworking: Apple Barrel paint can be used to paint furniture, toys, and other wooden objects. It is also a good choice for painting unfinished wood, as it will provide a smooth, even finish.
  • Paper crafts: Apple Barrel paint can be used to paint paper crafts, such as greeting cards, scrapbook pages, and other decorative projects. It is also a good choice for painting on canvas, as it will provide a vibrant, opaque finish.
  • Fabric crafts: Apple Barrel paint can be used to paint fabric crafts, such as clothing, pillows, and other accessories. It is also a good choice for painting on fabric that will be washed, as it is water-resistant.
  • Styrofoam: Apple Barrel paint can be used to paint Styrofoam, such as for crafts or for making signs. It is also a good choice for painting on Styrofoam that will be exposed to the elements, as it is weather-resistant.
  • Terracotta: Apple Barrel paint can be used to paint terracotta, such as for flower pots, planters, and other decorative objects. It is also a good choice for painting on terracotta that will be exposed to the elements, as it is weather-resistant.

Apple Barrel paint is also a good choice for beginners, as it is easy to use and affordable. It is available in a wide variety of colors, so you can find the perfect shade for your project.

Here are some additional things to keep in mind when using Apple Barrel paint:

  • It is a water-based paint, so it is easy to clean up with water.
  • It dries quickly, so you can usually apply multiple coats in a short amount of time.
  • It is not as durable as some other types of paint, so it may not be the best choice for projects that will be exposed to a lot of wear and tear.

Overall, Apple Barrel paint is a versatile and affordable option for a variety of craft projects. It is easy to use and provides a vibrant, opaque finish. If you are looking for a good all-purpose acrylic craft paint, Apple Barrel is a good choice.

Is Apple Barrel a good acrylic paint?

Apple Barrel is a good acrylic paint for beginners and for projects that do not require a lot of durability. It is affordable, easy to use, and provides a vibrant, opaque finish. However, it is not as durable as some other types of acrylic paint, so it may not be the best choice for projects that will be exposed to a lot of wear and tear.

Here are some of the pros and cons of Apple Barrel acrylic paint:

Pros:

  • Affordable
  • Easy to use
  • Vibrant, opaque finish
  • Water-based, so it is easy to clean up
  • Available in a wide variety of colors

Cons:

  • Not as durable as some other types of acrylic paint
  • Some colors can be thin and streaky
  • Not the best choice for projects that will be exposed to a lot of wear and tear

Overall, Apple Barrel is a good acrylic paint for beginners and for projects that do not require a lot of durability. If you are looking for an affordable, easy-to-use paint that provides a vibrant finish, Apple Barrel is a good option.

Here are some other acrylic paints that are similar to Apple Barrel:

  • Plaid FolkArt: This paint is also affordable and easy to use. It is available in a wide variety of colors, and it dries to a durable finish.
  • Liquitex Basics: This paint is a bit more expensive than Apple Barrel or FolkArt, but it is also more durable. It is a good choice for projects that will be exposed to a lot of wear and tear.
  • Golden Fluid Acrylics: This paint is the most expensive of the three, but it is also the most durable. It is a good choice for professional artists or for projects that will be displayed in a museum or gallery.

No matter which acrylic paint you choose, be sure to test it on a scrap piece of paper or fabric before you start your project. This will help you to see how the paint looks and behaves, and to make sure that you’re happy with the color.

Is Apple Barrel paint good for clothes?

Apple Barrel paint is a water-based acrylic paint that is generally considered to be safe for use on clothing. However, it is important to note that the durability of the paint will depend on the type of fabric you are painting and how you care for the garment after it is painted.

Here are some tips for using Apple Barrel paint on clothes:

  • Test the paint on an inconspicuous area of the garment first to make sure that it does not bleed or fade.
  • Apply the paint in thin, even coats.
  • Allow each coat of paint to dry completely before applying the next coat.
  • Iron the garment on the reverse side after it is dry to help set the paint.
  • Wash the garment on a gentle cycle in cold water.

With proper care, Apple Barrel paint can provide a long-lasting and vibrant finish on your clothes. However, it is important to note that the paint may not be as durable as some other types of fabric paint, so it may not be the best choice for garments that will be exposed to a lot of wear and tear.

Here are some other types of fabric paint that are similar to Apple Barrel:

  • Spray paint: This type of paint is easy to apply and dries quickly, but it can be difficult to control.
  • Fabric markers: These markers are easy to use and provide a precise application, but they may not be as durable as other types of fabric paint.
  • Fabric paint pens: These pens are similar to fabric markers, but they provide a thicker line.
  • Fabric dye: This type of dye is more permanent than paint, but it can be difficult to apply evenly.

No matter which type of fabric paint you choose, be sure to test it on an inconspicuous area of the garment first to make sure that it does not bleed or fade. And, always follow the manufacturer’s instructions for care and application.

Does Apple Barrel paint wash off?

Apple Barrel paint is a water-based acrylic paint, which means that it can be washed off with soap and water. However, it is important to note that the paint may not be completely removed, especially if it has been applied multiple times or if it has been allowed to dry for a long period of time.

Here are some tips for washing off Apple Barrel paint:

  • Start by soaking the painted surface in warm water for a few minutes.
  • Then, apply a mild soap to the surface and scrub gently with a sponge or cloth.
  • Rinse the surface thoroughly with warm water.
  • If the paint is still visible, repeat the process.

If the paint is still visible after washing, you may need to use a stronger soap or a solvent such as rubbing alcohol. However, be careful not to use too much solvent, as it can damage the fabric.

It is also important to note that Apple Barrel paint may bleed or fade over time, especially if it is washed in hot water or if it is exposed to sunlight. To help prevent this, you can iron the painted surface on the reverse side after it is dry. This will help to set the paint and make it more durable.

Overall, Apple Barrel paint can be washed off, but it may not be completely removed. The best way to remove the paint will depend on the type of surface that it is applied to and how long it has been allowed to dry.

Is Apple Barrel Paint water proof?

Yes, Apple Barrel paint is water-resistant when it dries. However, it is not completely waterproof, so it may not be the best choice for projects that will be exposed to a lot of water or moisture.

Here are some tips for making Apple Barrel paint more waterproof:

  • Apply multiple coats of paint. This will help to create a thicker layer of paint that is more resistant to water.
  • Use a sealant. A sealant will help to protect the paint from water and moisture.
  • Avoid washing the painted surface with hot water. Hot water can cause the paint to bleed or fade.
  • Store the painted surface in a cool, dry place. This will help to prevent the paint from fading or becoming damaged.

With proper care, Apple Barrel paint can provide a long-lasting and vibrant finish on your projects. However, it is important to note that the paint may not be as durable as some other types of waterproof paint, so it may not be the best choice for projects that will be exposed to a lot of wear and tear.

Here are some other types of waterproof paint that are similar to Apple Barrel:

  • Polyurethane: This type of paint is very durable and resistant to water, moisture, and fading.
  • Epoxy: This type of paint is also very durable and resistant to water, moisture, and fading.
  • Latex: This type of paint is less durable than polyurethane or epoxy, but it is still water-resistant and easy to apply.

No matter which type of waterproof paint you choose, be sure to test it on an inconspicuous area of your project first to make sure that it does not bleed or fade. And, always follow the manufacturer’s instructions for care and application.

Montana Black spray paint tips and tricks 2023

Check the latest price on Amazon

Here are some Montana Black spray paint tips and tricks:

  • Shake well. This is the most important tip, as Montana Black spray paint has a high pigment load that needs to be evenly dispersed. Shake the can vigorously for at least 2 minutes, or until you hear the mixing balls rattling freely.
  • Work in a well-ventilated area. Montana Black spray paint is solvent-based, so it can be harmful to breathe in the fumes. Work in a well-ventilated area, or wear a mask to protect yourself.
  • Start with a light coat. It’s better to start with a light coat and build up to the desired coverage, rather than applying too much paint at once. This will help to prevent the paint from running or dripping.
  • Hold the can at a distance. When spraying, hold the can at a distance of about 12-18 inches from the surface. This will help to create a smooth, even coat of paint.
  • Apply thin coats. As mentioned above, it’s better to apply thin coats of paint than one thick coat. This will help the paint to dry more evenly and prevent it from cracking or peeling.
  • Let the paint dry completely. Montana Black spray paint dries quickly, but it’s important to let each coat dry completely before applying the next one. This will help to prevent the paint from lifting or peeling.

Here are some additional tips and tricks:

  • Use a primer. If you’re painting on a porous surface, such as wood or metal, use a primer before applying the Montana Black spray paint. This will help the paint to adhere better and prevent it from chipping or peeling.
  • Use a clear coat. To protect your finished project, apply a clear coat over the Montana Black spray paint. This will help to prevent the paint from fading or scratching.
  • Experiment with different techniques. There are many different ways to use Montana Black spray paint. Experiment with different techniques to find what works best for you.
  • Have fun! Montana Black spray paint is a versatile and fun medium to use. Let your creativity run wild and see what you can create.

I hope these tips help you get the most out of your Montana Black spray paint.

How long does it take for Montana black spray paint to dry?

Montana Black spray paint dries to the touch in about 15-20 minutes, depending on the environmental conditions and the amount of layers of paint you apply. The total drying time is about 24 hours.

Here are some factors that can affect the drying time of Montana Black spray paint:

  • Temperature: The paint will dry faster in warm temperatures and slower in cold temperatures.
  • Humidity: The paint will dry slower in humid conditions.
  • Number of layers: The paint will take longer to dry if you apply multiple layers.
  • Surface: The paint will dry faster on a smooth surface than on a rough surface.

If you’re in a hurry, you can speed up the drying time of Montana Black spray paint by using a hair dryer on the cool setting. However, be careful not to overheat the paint, as this can cause it to crack or peel.

Here are some tips for getting the best results with Montana Black spray paint:

  • Shake the can well before use. This will help to ensure that the paint is evenly dispersed.
  • Work in a well-ventilated area. The fumes from Montana Black spray paint can be harmful, so it’s important to work in a well-ventilated area.
  • Start with a light coat. It’s better to start with a light coat and build up to the desired coverage, rather than applying too much paint at once. This will help to prevent the paint from running or dripping.
  • Apply thin coats. As mentioned above, it’s better to apply thin coats of paint than one thick coat. This will help the paint to dry more evenly and prevent it from cracking or peeling.
  • Let the paint dry completely between coats. This is important to prevent the paint from lifting or peeling.

I hope this helps!

How do you get Montana spray paint to work?

Montana spray paint is a high-quality spray paint that is known for its vibrant colors and smooth finish. However, it can be a bit tricky to get it to work properly. Here are some tips on how to get Montana spray paint to work:

  1. Shake the can well. This is the most important step, as Montana spray paint has a high pigment load that needs to be evenly dispersed. Shake the can vigorously for at least 2 minutes, or until you hear the mixing balls rattling freely.
  2. Work in a well-ventilated area. Montana spray paint is solvent-based, so it can be harmful to breathe in the fumes. Work in a well-ventilated area, or wear a mask to protect yourself.
  3. Start with a light coat. It’s better to start with a light coat and build up to the desired coverage, rather than applying too much paint at once. This will help to prevent the paint from running or dripping.
  4. Hold the can at a distance. When spraying, hold the can at a distance of about 12-18 inches from the surface. This will help to create a smooth, even coat of paint.
  5. Apply thin coats. As mentioned above, it’s better to apply thin coats of paint than one thick coat. This will help the paint to dry more evenly and prevent it from cracking or peeling.
  6. Let the paint dry completely. Montana spray paint dries quickly, but it’s important to let each coat dry completely before applying the next one. This will help to prevent the paint from lifting or peeling.

Here are some additional tips:

  • Use a primer. If you’re painting on a porous surface, such as wood or metal, use a primer before applying the Montana spray paint. This will help the paint to adhere better and prevent it from chipping or peeling.
  • Use a clear coat. To protect your finished project, apply a clear coat over the Montana spray paint. This will help to prevent the paint from fading or scratching.
  • Experiment with different techniques. There are many different ways to use Montana spray paint. Experiment with different techniques to find what works best for you.
  • Have fun! Montana spray paint is a versatile and fun medium to use. Let your creativity run wild and see what you can create.

I hope these tips help you get the most out of your Montana spray paint.

Is Montana spray paint permanent?

Montana spray paint is considered to be permanent, but it can fade or be removed over time. The longevity of the paint will depend on the surface you are painting on, the type of Montana spray paint you are using, and the conditions it is exposed to.

Here are some factors that can affect the longevity of Montana spray paint:

  • Surface: The paint will last longer on a smooth surface than on a rough surface.
  • Type of Montana spray paint: Some Montana spray paints are more durable than others. For example, Montana GOLD is a high-quality acrylic spray paint that is known for its long-lasting finish.
  • Conditions: The paint will last longer in a dry, cool environment than in a humid, hot environment.

If you want your Montana spray paint to last as long as possible, there are a few things you can do:

  • Use a primer: A primer will help the paint to adhere to the surface better and prevent it from fading or peeling.
  • Apply multiple coats: Applying multiple coats of paint will help to build up the thickness of the paint and make it more durable.
  • Let the paint dry completely: It is important to let the paint dry completely between coats and before exposing it to the elements.
  • Store the paint properly: When you are not using the paint, store it in a cool, dry place.

By following these tips, you can help to ensure that your Montana spray paint will last for many years to come.

Montana Black spray paint is a high-quality spray paint that is known for its vibrant colors, smooth finish, and durable performance. It is a popular choice for artists, graffiti writers, and DIY enthusiasts.

Here are some of the pros and cons of Montana Black spray paint:

Pros:

  • High pigment load: Montana Black spray paint has a high pigment load, which means that the colors are very intense and bold. This is perfect for creating eye-catching designs that stand out from their surroundings.
  • Smooth finish: Montana Black spray paint dries to a smooth, even finish. This is ideal for creating professional-looking projects.
  • Durable performance: Montana Black spray paint is durable and resistant to fading, scratching, and peeling. This makes it a good choice for projects that will be exposed to the elements.
  • Wide range of colors: Montana Black spray paint comes in a wide range of colors, so you can find the perfect shade for your project.
  • Versatile: Montana Black spray paint can be used on a variety of surfaces, including wood, metal, plastic, and canvas.

Cons:

  • Solvent-based: Montana Black spray paint is solvent-based, so it can have a strong odor. It is important to work in a well-ventilated area when using this type of paint.
  • Pricey: Montana Black spray paint is more expensive than some other brands of spray paint.
  • Not suitable for all surfaces: Montana Black spray paint is not suitable for all surfaces. It is important to check the product label to see if the paint is compatible with the surface you are painting on.

Overall, Montana Black spray paint is a high-quality spray paint that is a good choice for artists, graffiti writers, and DIY enthusiasts. It is important to be aware of the pros and cons of this type of paint before you purchase it.

Rust Oleum Painter’s Touch 2X Ultra Cover Spray Paint tips 2023

Check the latest price on Amazon

Here are some tips and tricks for using Rust Oleum Painter’s Touch 2X Ultra Cover Spray Paint:

  • Shake the can well for at least 2 minutes before use. This will ensure that the paint is evenly mixed and that you get the best coverage.
  • Apply 2 or more light coats, allowing 10-15 minutes of dry time between coats. This will help to prevent runs and drips.
  • Spray in a steady, back-and-forth motion, holding the can about 8-10 inches from the surface. Don’t overspray, as this can cause the paint to run.
  • Work in a well-ventilated area. The fumes from the spray paint can be harmful, so it’s important to spray in a place where there is plenty of fresh air.
  • Protect your workspace. The spray paint can make a mess, so it’s a good idea to cover your workspace with a drop cloth or newspaper.
  • Let the paint dry completely before handling or using the surface. This usually takes about 24 hours.

Here are some additional tips:

  • For best results, sand the surface lightly before painting. This will help the paint to adhere better.
  • If you are painting over a glossy surface, you will need to use a primer first. This will help the paint to adhere and prevent it from peeling.
  • If you are painting in cold weather, bring the can inside to warm up for a few minutes before using. This will help to prevent the paint from clogging the nozzle.
  • Clean the nozzle after use. This will help to prevent the paint from drying in the nozzle and making it difficult to use the can again.

I hope these tips help you get the best results.


There are many reasons why you might want to buy Rust-Oleum Painter’s Touch 2X Ultra Cover Spray Paint. Here are a few of the most common reasons:

  • It provides twice the coverage as Rust-Oleum® general purpose spray paint in each coat. This means that you can finish projects faster and use less paint.
  • It dries quickly and leaves a smooth, durable finish. This makes it a good choice for projects that need to be completed quickly or that will be exposed to the elements.
  • It is available in a wide variety of colors. This means that you can find the perfect color for your project.
  • It is relatively inexpensive. This makes it a good value for the money.

Here are some additional reasons why you might want to buy Rust-Oleum Painter’s Touch 2X Ultra Cover Spray Paint:

  • It is easy to use. The spray can has a comfort spray tip that makes it easy to control the flow of paint.
  • It is versatile. It can be used on a variety of surfaces, including wood, metal, plastic, and wicker.
  • It is durable. The paint is resistant to chipping and fading, so your project will last for years to come.

Overall, Rust-Oleum Painter’s Touch 2X Ultra Cover Spray Paint is a good choice for a variety of projects. It is easy to use, versatile, and durable. If you are looking for a spray paint that will give you professional-looking results, it is a good option.

Here are some of the pros and cons of Rust-Oleum Painter’s Touch 2X Ultra Cover Spray Paint:

Pros:

  • Provides twice the coverage as Rust-Oleum® general purpose spray paint in each coat.
  • Dries quickly and leaves a smooth, durable finish.
  • Available in a wide variety of colors.
  • Relatively inexpensive.
  • Easy to use.
  • Versatile.
  • Durable.

Cons:

  • Can be messy to use.
  • The paint can be strong-smelling, so it’s important to use it in a well-ventilated area.
  • The paint can be flammable, so it’s important to keep it away from heat and open flames.
  • The paint can chip or fade over time, especially if it is exposed to the elements.

Overall, Rust-Oleum Painter’s Touch 2X Ultra Cover Spray Paint is a good choice for a variety of projects. It is easy to use, versatile, and durable. However, it is important to be aware of the potential drawbacks before using it.

Krylon COLORmaxx Spray Paint and Primer tips and guides 2023

Check the latest price on Amazon

Here are some tips and guides for using Krylon COLORmaxx Spray Paint and Primer:

  • Shake the can well for 2 minutes before use. This will ensure that the paint and primer are mixed evenly.
  • Apply the paint in a well-ventilated area. The fumes can be strong, so it’s best to work outside or in a garage with the doors open.
  • Start by spraying a light coat of paint. This will help to prevent runs and drips.
  • Apply additional coats of paint as needed. Let each coat dry completely before applying the next one.
  • For best results, apply the paint in a smooth, even motion. Don’t overspray, as this can create a build-up of paint.
  • Let the paint dry completely before handling or using the project. This will typically take 20 minutes to dry to the touch and 1 hour to dry to handle.

Additional tips:

  • For best results, use the paint on a clean, dry surface. If the surface is dirty or oily, the paint may not adhere properly.
  • If you’re painting metal, be sure to sand the surface lightly before applying the paint. This will help the paint to adhere better.
  • For outdoor projects, use a paint that is specifically designed for exterior use. This will help the paint to withstand the elements.
  • Clean up any spills or drips immediately with mineral spirits. This will prevent the paint from hardening and becoming difficult to remove.

Here are some guides for using Krylon COLORmaxx Spray Paint and Primer on specific surfaces:

  • Wood: Sand the wood lightly before applying the paint. This will help the paint to adhere better.
  • Metal: Sand the metal lightly with a wire brush to remove any rust or debris. Then, apply a coat of primer before applying the paint.
  • Plastic: Clean the plastic with soap and water before applying the paint.
  • Glass: Clean the glass with glass cleaner before applying the paint.
  • Fabric: Test the paint on an inconspicuous area of the fabric first to make sure it doesn’t bleed or fade.

I hope these tips and guides help you get the best results when using Krylon COLORmaxx Spray Paint and Primer.

There are many reasons why you might want to use Krylon COLORmaxx Spray Paint and Primer. Here are a few of the benefits:

  • It’s a paint and primer in one, so you don’t have to worry about applying two separate products. This saves time and money.
  • It provides premium coverage and superior color. The paint is thick and opaque, so you only need to apply one or two coats to get the desired coverage.
  • It has adhesion and durability. The paint will adhere to a variety of surfaces, including wood, metal, plastic, glass, and fabric. It is also durable enough to withstand the elements, making it a good choice for outdoor projects.
  • It is easy to use. The spray can has a large button tip that makes it easy to spray the paint evenly.
  • It is available in a variety of colors and finishes. This means you can find the perfect color to match your project.

Overall, Krylon COLORmaxx Spray Paint and Primer is a versatile and easy-to-use product that can be used for a variety of projects. It provides premium coverage, superior color, and adhesion and durability. If you are looking for a paint and primer in one, Krylon COLORmaxx Spray Paint and Primer is a great option.

Here are some additional reasons why you might want to use Krylon COLORmaxx Spray Paint and Primer:

  • It is fast drying. The paint dries to the touch in 20 minutes and dries to handle in 1 hour. This means you can complete your project quickly.
  • It is affordable. Krylon COLORmaxx Spray Paint and Primer is a relatively inexpensive product. This makes it a good option for budget-minded DIYers.
  • It is environmentally friendly. Krylon COLORmaxx Spray Paint and Primer is low-odor and contains no harmful chemicals. This makes it a safe choice for indoor and outdoor use.

I hope this helps!

Here are some pros and cons of Krylon COLORmaxx Spray Paint and Primer:

Pros:

  • Paint and primer in one: This saves time and money, as you don’t have to apply two separate products.
  • Premium coverage and superior color: The paint is thick and opaque, so you only need to apply one or two coats to get the desired coverage.
  • Adhesion and durability: The paint will adhere to a variety of surfaces, including wood, metal, plastic, glass, and fabric. It is also durable enough to withstand the elements, making it a good choice for outdoor projects.
  • Easy to use: The spray can has a large button tip that makes it easy to spray the paint evenly.
  • Available in a variety of colors and finishes: This means you can find the perfect color to match your project.
  • Fast drying: The paint dries to the touch in 20 minutes and dries to handle in 1 hour. This means you can complete your project quickly.
  • Affordable: Krylon COLORmaxx Spray Paint and Primer is a relatively inexpensive product. This makes it a good option for budget-minded DIYers.
  • Environmentally friendly: Krylon COLORmaxx Spray Paint and Primer is low-odor and contains no harmful chemicals. This makes it a safe choice for indoor and outdoor use.

Cons:

  • Can be messy: The paint can be a bit messy to apply, so it’s important to work in a well-ventilated area and wear protective clothing.
  • Not as durable as some other paints: The paint is not as durable as some other paints, so it may not be the best choice for high-traffic areas or projects that will be exposed to the elements.
  • Some colors may fade over time: Some of the colors in the Krylon COLORmaxx line may fade over time, so it’s important to choose a color that will be well-suited for your project.

Overall, Krylon COLORmaxx Spray Paint and Primer is a versatile and easy-to-use product that can be used for a variety of projects. It provides premium coverage, superior color, and adhesion and durability. However, it’s important to be aware of the potential messiness and potential fading of some colors before using this product.

Performix Plasti Dip tips and guides 2023

Check the latest price on Amazon

Here are the steps on how to use Performix Plasti Dip:

  1. Shake the can vigorously for 2 minutes. This will ensure that the plasti dip is evenly mixed.
  2. Choose a well-ventilated area to work in. Plasti dip can be harmful if inhaled, so it’s important to work in a place where there is plenty of fresh air.
  3. Cover any areas that you don’t want to get plasti dip on with newspaper or painter’s tape. This includes your floor, furniture, and any other surfaces that you don’t want to get messy.
  4. Apply the plasti dip in a thin, even coat. Do not overspray, as this can cause the plasti dip to become too thick and difficult to apply.
  5. Allow the first coat to dry completely before applying the next coat. This will usually take about 30 minutes.
  6. Apply 2-3 more coats of plasti dip, allowing each coat to dry completely before applying the next. The more coats you apply, the thicker and more durable the finish will be.
  7. Once the plasti dip is dry, you can peel off the painter’s tape and enjoy your new, customized look!

Here are some additional tips for using Performix Plasti Dip:

  • For best results, apply the plasti dip in a warm, dry environment.
  • If you are spraying the plasti dip, hold the can about 6-8 inches away from the surface and apply in a sweeping motion.
  • If you are brushing the plasti dip, use a soft-bristled brush and apply in long, even strokes.
  • If you are dipping an object in the plasti dip, make sure to coat it completely and allow it to dry upside down so that the excess plasti dip can drip off.
  • Plasti dip can be removed by peeling it off or by using a heat gun to soften it.

Plasti dip is a versatile product that can be used to protect, decorate, and customize a variety of objects. With a little practice, you can use it to create your own unique look.

There are many reasons why you might want to buy Performix Plasti Dip. Here are a few of the most common reasons:

  • To protect your belongings. Plasti dip is a durable coating that can protect your belongings from the elements, such as water, dirt, and UV rays. This makes it a great choice for protecting things like car rims, tools, and furniture.
  • To customize your belongings. Plasti dip is available in a variety of colors, so you can use it to customize the look of your belongings. This is a great way to add a personal touch to your belongings or to make them stand out from the crowd.
  • To create a temporary coating. Plasti dip is a removable coating, so you can use it to create a temporary change in the look of your belongings. This is a great way to try out a new color or design without making a permanent commitment.

Overall, Performix Plasti Dip is a versatile product that can be used for a variety of purposes. If you are looking for a way to protect, customize, or temporarily change the look of your belongings, then Plasti dip is a great option.

Here are some additional benefits of using Performix Plasti Dip:

  • Affordable. Plasti dip is a relatively inexpensive product, making it a great option for budget-minded DIYers.
  • Easy to use. Plasti dip is easy to apply and remove, making it a great choice for first-time users.
  • Versatile. Plasti dip can be used on a variety of surfaces, including metal, plastic, wood, and fabric.
  • Durable. Plasti dip is a durable coating that can withstand wear and tear.
  • Removable. Plasti dip can be removed easily, leaving no residue behind.

If you are looking for a versatile, affordable, and easy-to-use coating for your belongings, then Performix Plasti Dip is a great option.

Pros of Performix Plasti Dip:

  • Affordable: Performix Plasti Dip is a relatively inexpensive product, especially when compared to traditional paint or powder coating.
  • Easy to apply: Performix Plasti Dip can be applied with a spray gun or by brush. It is important to follow the manufacturer’s instructions carefully to ensure a good finish.
  • Removable: Performix Plasti Dip can be peeled off without damaging the underlying surface. This makes it a great option for temporary applications, such as changing the color of your car wheels for a race or event.
  • Durable: Performix Plasti Dip is a durable coating that can withstand the elements and protect your surfaces from scratches, dents, and fading.
  • Versatile: Performix Plasti Dip is available in a variety of colors, so you can customize the look of your project.

Cons of Performix Plasti Dip:

  • Not as durable as traditional paint or powder coating: Performix Plasti Dip is not as durable as traditional paint or powder coating, so it may not be the best option for long-term protection.
  • Can be difficult to remove: If you apply Performix Plasti Dip incorrectly, it can be difficult to remove. It is important to follow the manufacturer’s instructions carefully to avoid this problem.
  • Not as smooth as traditional paint or powder coating: Performix Plasti Dip has a slightly textured finish that may not be to everyone’s taste.

Overall, Performix Plasti Dip is a versatile and affordable coating that can be used to protect and change the look of a variety of surfaces. It is a good option for DIYers who are looking for a temporary or reversible solution.

VHT SP187 High Heat Wheel Paint tips and guides 2023

Check the latest price on Amazon

Here are the steps on how to use VHT SP187 High Heat Wheel Paint:

  1. Prepare the surface. Clean the wheel with a degreaser and allow it to dry completely. Sand the wheel with 320 grit sandpaper or a scuff pad. Wipe away any dust with a clean cloth.
  2. Apply the paint. Shake the can vigorously for 2 minutes. Apply the paint in a thin, even coat, about 6-12 inches from the wheel. Allow each coat to dry completely before applying the next coat. For best results, apply 2-3 coats of paint.
  3. Apply a clear coat. A clear coat will help to protect the paint and give it a glossy finish. Apply the clear coat in a thin, even coat and allow it to dry completely.
  4. Allow the paint to cure. The paint will need to cure for at least 24 hours before driving the vehicle.

Here are some additional tips for using VHT SP187 High Heat Wheel Paint:

  • Work in a well-ventilated area. The paint contains solvents that can be harmful if inhaled.
  • Wear gloves and a respirator when applying the paint. The solvents can irritate the skin and lungs.
  • Do not apply the paint in direct sunlight or in temperatures above 90 degrees Fahrenheit. The paint will not dry properly in these conditions.
  • Allow the paint to dry for at least 24 hours before driving the vehicle.

VHT SP187 High Heat Wheel Paint is a great way to protect your wheels from the elements. With proper preparation and application, the paint will last for years.

Here are some additional things to keep in mind:

  • If you are painting the wheels on your vehicle, it is a good idea to remove them first. This will make it easier to get to all sides of the wheels and will prevent overspray from getting on the rest of your car.
  • If you are not comfortable painting the wheels yourself, you can take them to a professional.
  • VHT SP187 High Heat Wheel Paint is available in a variety of colors, so you can choose the perfect color to match your car.

There are many reasons why you might want to buy VHT SP187 High Heat Wheel Paint. Here are a few of the most common reasons:

  • To protect your wheels from the elements. VHT SP187 High Heat Wheel Paint is designed to withstand high temperatures, so it can help to protect your wheels from the sun, road salt, and other harsh elements.
  • To improve the appearance of your wheels. VHT SP187 High Heat Wheel Paint is available in a variety of colors, so you can choose the perfect color to match your car.
  • To give your wheels a new lease on life. If your wheels are scratched, faded, or otherwise damaged, VHT SP187 High Heat Wheel Paint can help to restore them to their former glory.
  • To save money. Painting your own wheels can be a cost-effective way to improve the look and protect your wheels.

Here are some of the pros and cons of VHT SP187 High Heat Wheel Paint:

Pros:

  • Easy to apply
  • Dries to a durable finish
  • Available in a variety of colors
  • Can protect your wheels from the elements
  • Can improve the appearance of your wheels
  • Can save you money

Cons:

  • Can be hazardous to your health if not used properly
  • Can be difficult to remove if you don’t like the results
  • May not last as long as professional-grade paint

Overall, VHT SP187 High Heat Wheel Paint is a great option for anyone looking to protect and improve the appearance of their wheels. It is easy to apply, dries to a durable finish, and is available in a variety of colors. However, it is important to note that the paint can be hazardous to your health if not used properly, and it may not last as long as professional-grade paint.

Dupli-Color High-Performance Wheel Coating tips and guides 2023

Check the latest price on Amazon

Here are the steps on how to use Dupli-Color High-Performance Wheel Coating:

  1. Prepare the wheels. Clean the wheels thoroughly with soap and water, then degrease them with a wheel cleaner. Sand the wheels with 180-grit sandpaper, then wipe them down with a clean rag.
  2. Apply the primer. Apply the primer evenly to the wheels, using a light coat. Allow the primer to dry completely.
  3. Apply the paint. Apply the paint evenly to the wheels, using a light coat. Allow the paint to dry completely between coats. Apply 3-4 coats for best results.
  4. Clearcoat the wheels. Apply the clearcoat evenly to the wheels, using a light coat. Allow the clearcoat to dry completely.

Here are some additional tips:

  • Work in a well-ventilated area.
  • Wear gloves and safety glasses when working with the paint.
  • Do not apply the paint in direct sunlight or extreme heat.
  • Allow the paint to dry for at least 24 hours before driving the car.

Benefits of using Dupli-Color High-Performance Wheel Coating:

  • Durable finish that resists brake dust, chemicals, and the elements.
  • Restores original wheel appearance or allows for customization.
  • Resists cracking, flaking, and peeling.
  • Easy to apply.

If you are looking for a high-quality wheel coating that will protect your wheels and give them a new look, Dupli-Color High-Performance Wheel Coating is a great option.

Some additional tips for getting the best results when using Dupli-color High-Performance Wheel Coating:

  • Make sure the wheels are clean and dry before applying the coating.
  • Apply the coating in a well-ventilated area.
  • Use light coats of the coating and allow them to dry completely between coats.
  • Apply 3-4 coats of the coating for best results.
  • Allow the coating to dry completely before driving the car.

Here are some common problems that can occur when using Dupli-color High-Performance Wheel Coating and how to fix them:

  • The coating is not adhering to the wheels. This can be caused by the wheels not being clean or dry enough, or by using too much or too little coating. Make sure the wheels are clean and dry before applying the coating, and use light coats of the coating.
  • The coating is cracking or peeling. This can be caused by the coating not being applied properly, or by the wheels being exposed to harsh chemicals or elements. Make sure the coating is applied properly, and protect the wheels from harsh chemicals and elements.
  • The coating is not shiny. This can be caused by the coating not being applied evenly, or by the wheels being exposed to direct sunlight. Apply the coating evenly, and protect the wheels from direct sunlight.

Dupli-Color High-Performance Wheel Coating is a high-quality wheel coating that offers a number of benefits. It is durable, resists brake dust, chemicals, and the elements, and it can be used to restore the original wheel appearance or to customize the wheels with a new look. Dupli-Color High-Performance Wheel Coating is also easy to apply.

Here are some of the pros and cons of Dupli-Color High-Performance Wheel Coating:

Pros:

  • Durable finish that resists brake dust, chemicals, and the elements.
  • Restores original wheel appearance or allows for customization.
  • Resists cracking, flaking, and peeling.
  • Easy to apply.

Cons:

  • Can be expensive.
  • May not be available in all colors.
  • May require multiple coats for best results.
  • Can be difficult to remove if not applied properly.

Overall, Dupli-Color High-Performance Wheel Coating is a great option for anyone looking for a high-quality wheel coating that will protect their wheels and give them a new look.

I hope this helps!

Rust-Oleum High-Performance Wheel Spray Paint tips and guides 2023

Check the latest price on Amazon

Rust-Oleum High-Performance Wheel Spray Paint is a great way to give your wheels a new look and protect them from rust. Here are some tips and guides for using this product:

  1. Prepare the wheels. Before you start painting, make sure the wheels are clean and dry. You can use a degreaser or wheel cleaner to remove any dirt, grease, or brake dust.
  2. Sand the wheels. Lightly sanding the wheels will help the paint to adhere better. Use a fine-grit sandpaper (220-320 grit) and sand in a circular motion.
  3. Clean the wheels again. Once you’re done sanding, wipe the wheels down with a clean, dry cloth to remove any sanding dust.
  4. Apply the paint. Start by spraying the paint in a well-ventilated area. Apply the paint in thin, even coats, working from the center of the wheel out to the edges. Allow each coat to dry completely before applying the next.
  5. Apply a clear coat. For added protection, you can apply a clear coat to the wheels. This will help to protect the paint from fading and chipping.

Here are some additional tips for using Rust-Oleum High-Performance Wheel Spray Paint:

  • For best results, apply the paint in warm, dry weather.
  • Do not apply the paint in direct sunlight.
  • Allow the paint to dry completely before driving the car.
  • This product is flammable, so keep it away from heat and open flames.
  • Use the product in a well-ventilated area to avoid inhaling the fumes.

With a little preparation and care, you can easily use Rust-Oleum High-Performance Wheel Spray Paint to give your wheels a new look and protect them from rust.

There are many reasons why you might buy Rust-Oleum High-Performance Wheel Spray. Here are a few of the most common reasons:

  • To protect your wheels from rust. Rust-Oleum High-Performance Wheel Spray is a high-quality paint that is specifically designed to protect your wheels from rust. It is also resistant to the elements, so it can help to keep your wheels looking good for years to come.
  • To give your wheels a new look. Rust-Oleum High-Performance Wheel Spray comes in a variety of colors, so you can choose the perfect color to match your car or your personal style. It is also a very durable paint, so you can be sure that your new look will last for a long time.
  • To save money. Painting your own wheels can be a great way to save money on wheel repair or replacement. Rust-Oleum High-Performance Wheel Spray is a relatively inexpensive product, and it is very easy to use. With a little time and effort, you can easily paint your own wheels and save a lot of money.

If you are looking for a high-quality, durable wheel paint that can help to protect your wheels from rust and give them a new look, Rust-Oleum High-Performance Wheel Spray is a great option. It is easy to use and affordable, making it a great choice for DIYers and budget-minded car owners alike.

Here are some of the pros and cons of Rust-Oleum High-Performance Wheel Spray:

Pros:

  • Easy to use
  • Affordable
  • Durable
  • Resistant to rust and the elements
  • Available in a variety of colors

Cons:

  • Can be messy to apply
  • Not as durable as some other wheel paints
  • Not as resistant to fading as some other wheel paints

Overall, Rust-Oleum High-Performance Wheel Spray is a good option for DIYers who are looking for a high-quality, affordable wheel paint. It is easy to use and provides good protection from rust and the elements. However, it is not as durable or resistant to fading as some other wheel paints.

Here are some of the common mistakes to avoid when using Rust-Oleum High-Performance Wheel Spray Paint:

  • Not preparing the wheels properly. This can lead to the paint not adhering properly and peeling or chipping off.
  • Not sanding the wheels properly. This can also lead to the paint not adhering properly.
  • Not applying the paint in thin, even coats. This can lead to the paint being uneven and looking patchy.
  • Not allowing the paint to dry completely between coats. This can lead to the paint cracking or peeling.
  • Not applying a clear coat. This can leave the paint unprotected and vulnerable to fading and chipping.

By following these tips and avoiding these mistakes, you can ensure that your Rust-Oleum High-Performance Wheel Spray Paint job turns out looking great.

Exit mobile version